
Overview
PCM Hub is a single workspace for Product Catalog Management. Products, attributes, catalogs, categories, classifications, selling models and related records are managed together, instead of across separate object tabs and record pages.
Make sure you can view the Product Catalog Management objects in your org, such as products, catalogs, categories and attributes. To create, edit or delete records you also need the matching permissions on each object. Buttons you are not allowed to use are grayed out or hidden. If you do not have enough access or permissions, please reach out to your system administrator for additional assistance.
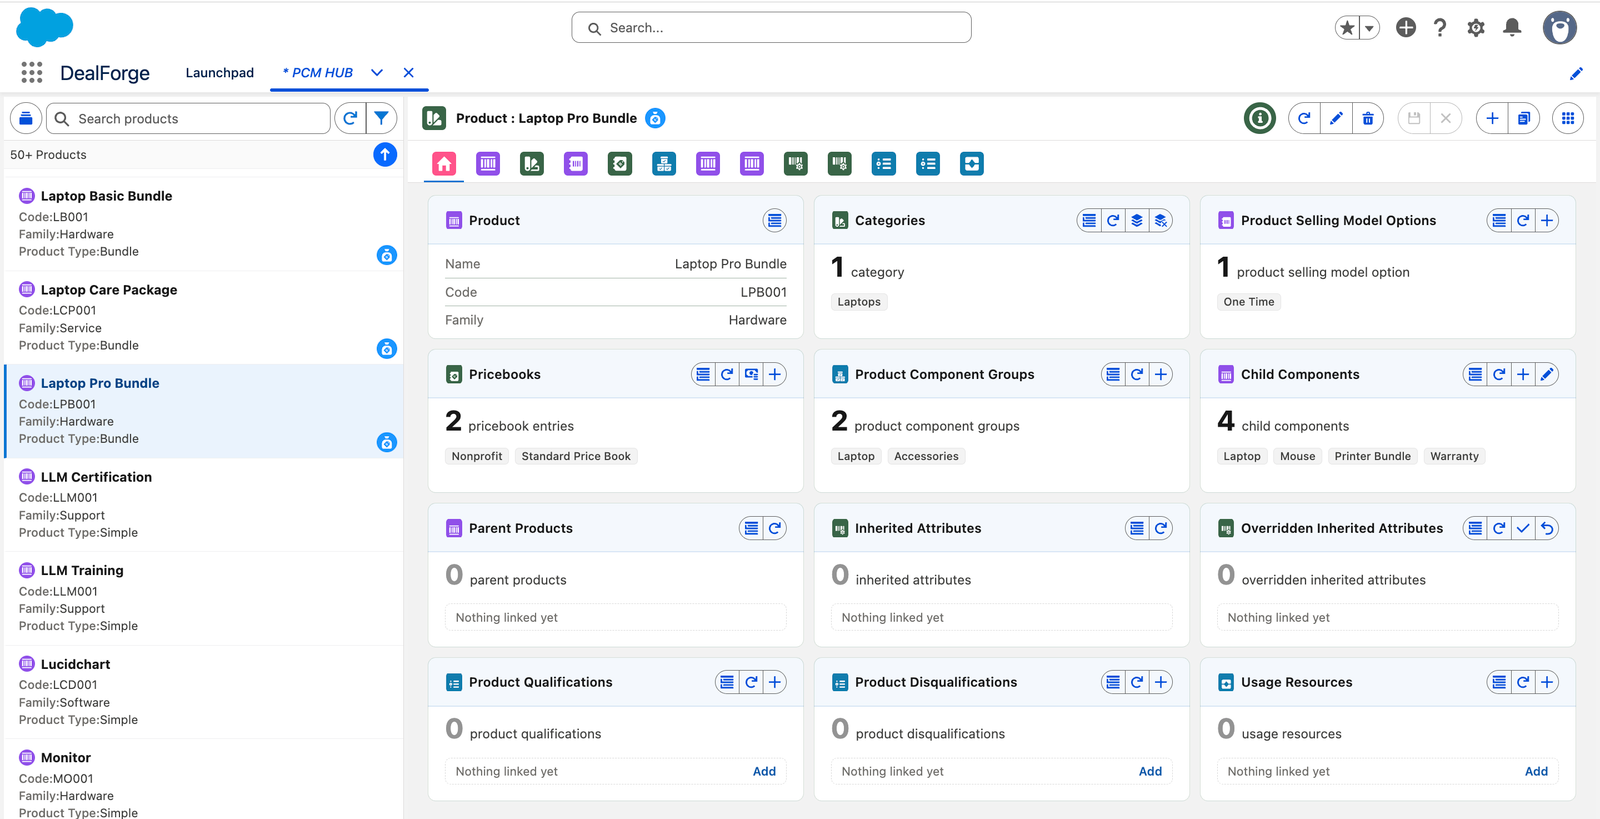
images/pcm-hub/overview.pngPCM Hub overviewWhy Use PCM Hub
- Manage your entire product catalog in one view. Browse products, categories, pricebooks and related records without leaving the page.
- Configure every product detail from a Smart Card. Edit a product, its selling models, pricebooks, categories and components in one window.
- Clone products and bundles. Launch faster. A deep clone copies the related records too, and you choose which to keep.
User Personas
| Persona | What they do | How they use PCM Hub |
|---|---|---|
| Product Catalog Administrator | Owns the structure and health of the catalog. | Maintains products, categories, classifications and attributes in one workspace. |
| Product Manager | Decides what is sold and how it is described. | Reviews and updates product details and their related records. |
| Pricing Analyst | Keeps pricing aligned with the catalog. | Checks selling models and related pricing records alongside each product. |
App Layout
PCM Hub opens as a two-pane workspace: a list of records on the left and the selected record on the right.
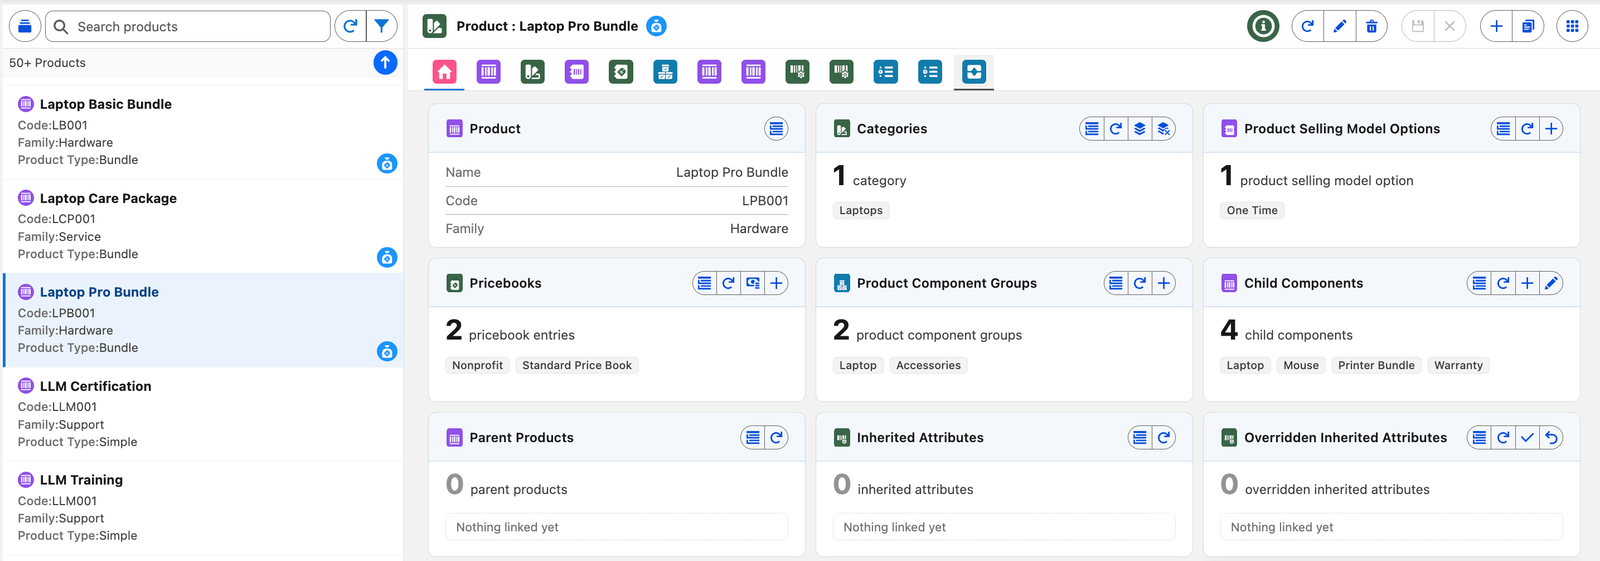
images/pcm-hub/app-layout.pngThe PCM Hub workspace, with each area numbered below- Header bar. Shows the icon and name of the selected record. A bundle product carries a small bundle icon next to its name. The action buttons on the right are listed under Header bar actions.
- Object picker. Hover over the button at the left of the toolbar to choose which kind of record the list shows. The objects are grouped as General, Attributes, Products, Qualifications, Usage and Policies. Use the search box at the top of the menu to find one by name.
- Search box. Type to narrow the list. Use the clear (x) icon inside the box to reset it.
- Refresh and filter. Next to the search box, a connected pair of buttons reloads the list and opens the filter panel. Use the filter panel to build your own criteria (a field, an operator and a value; add as many conditions as you need) or to apply, edit, save or delete a saved list view. See the List Views guide.
- Result count and sort. A line under the toolbar shows how many records match. The sort button beside it toggles between ascending and descending order.
- Record list. Each record is a tile showing its name and key details. Click a tile to open that record in the right panel. When more records match than are shown, a **Load more** button at the bottom of the list brings in the next set.
- Tabs. The right panel has an Overview tab, a details tab for the record itself, and one tab per related list. Which related lists appear depends on the object. For example, a product has tabs for its categories, selling model options, price book entries, component groups and attributes. The tab names show how many records each list holds once it has loaded.
- Right panel. The content area under the tabs. On the Overview tab it shows a summary card for each related list, with its own action buttons in the card header. The other tabs show the full details or the full list.
Header bar actions
The buttons in the header bar act on the selected record. Hover over any button to see its tooltip. A button is grayed out when it does not apply, for example when you do not have permission or the license is blocked.
| Icon | Action | What it does |
|---|---|---|
| Guidance | Opens app-specific guidance for using PCM Hub. | |
| Refresh | Reloads the selected record from the server. | |
| Edit | Switches to edit mode so you can change the record. | |
| Delete | Permanently deletes the record after you confirm. This cannot be undone. | |
| Save / Cancel | Appear while editing. Save keeps your changes and is grayed out until required fields are filled in; Cancel discards them and leaves edit mode. | |
| New | Creates a new record of the selected object. For products, a popup first asks for the record type, the product kind and its usage. | |
| Clone | Creates a copy of the selected record. For products this is a deep clone, copying the related records too. A chooser lets you untick any you do not want. See Cloning a Product. | |
| Send Feedback | Opens a form to report a bug, request a feature or share feedback with Clerisoft. See Sending Feedback. | |
| App launcher | Hover to see every DealForge app and jump to any of them. |
Edit and Delete appear only if you can update or delete the object, and New and Clone only if you can create it.
Record list actions
| Icon | Action | What it does |
|---|---|---|
| Object picker | Chooses which object the list shows. | |
| Search / clear | Filters the list as you type; clear empties the box. | |
| Refresh | Reloads the list from the server. | |
| Filter | Builds custom criteria to filter the list, or applies a saved list view. | |
| Sort | Toggles the list between ascending and descending order. |
Choosing What You See
PCM Hub works on one kind of record at a time. The left side chooses the list source, the kind of record the list shows. The right side shows everything that belongs to the record you select.
Choosing a list source
- Hover over the button at the left of the toolbar. The List Source menu opens. It opens on hover, so there is nothing to click first.
- Find the object. The menu is grouped, and the object you are on is highlighted and scrolled into view. To search, type in the box at the top of the menu; groups with no match disappear.
- Click the object. The menu closes and the list reloads with that object's records.
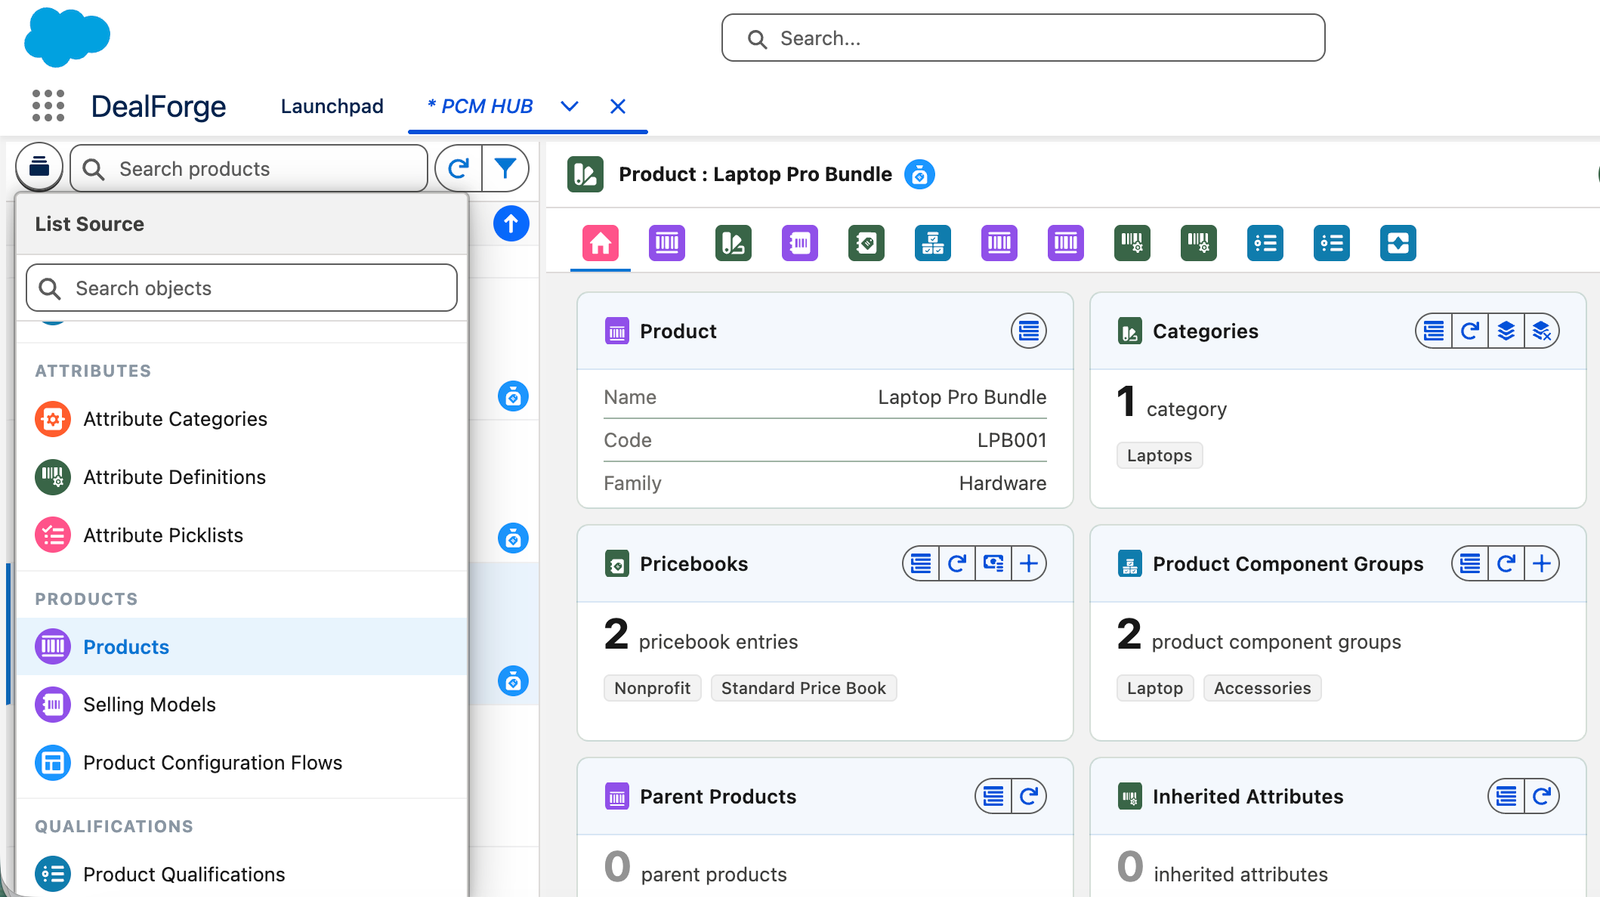
images/pcm-hub/list-source.pngThe List Source menu, opened by hovering over the object pickerPicking a different object starts you fresh: the search box and any filter are cleared, because they belong to the previous object. Picking the object you are already on just closes the menu.
| Group | Objects |
|---|---|
| General | Catalogs, Categories, Classifications |
| Attributes | Attribute Categories, Attribute Definitions, Attribute Picklists |
| Products | Products, Selling Models, Product Configuration Flows |
| Qualifications | Product Qualifications, Product Disqualifications, Product Category Qualifications, Product Category Disqualifications |
| Usage | Unit of Measure Classes, Units of Measure, Usage Resources, Product Usage Resources, Product Usage Grants, Rate Cards, Rate Card Entries, Price Book Rate Cards |
| Policies | Usage Aggregation, Usage Commitment, Usage Grant Refresh, Usage Grant Rollover, Usage Overage, Usage Resource, Product Usage Resource and Rating Frequency Policies |
Narrowing and ordering the list
Once you are on an object, use the toolbar to find the records you want:
| Tool | What it does |
|---|---|
| Search box | Filters the list by name as you type. The line under the toolbar then reads, for example, how many records match your search. |
| Filter | Builds criteria on the object's own fields, or applies a saved list view. A filter stays on until you clear it or change the list source. |
| Refresh | Reloads the list, so records others have added or changed appear. |
| Sort | Switches between ascending and descending order. |
| Load more | At the bottom of a long list. The count line shows a plus sign (for example 50+) while more records are waiting. |
Saving a filter as a list view
If you filter the same way often, save it. Click Filter, then New, choose a field, operator and value for each condition, name the view and save. The view is saved for the object you are on, so a Products view is offered whenever Products is the List Source, and you can make it Public to share it with your team (administrators only). Open the filter again at any time to apply, edit or delete a saved view.
The full steps, the operators for each type of field and the difference between a saved view and a quick view are in the List Views guide.
What the right side shows
Select a record and the right panel fills with its data. It is split into tabs, one for each data set.
- Overview. A tile for each related list, showing how many records it holds and a few of their names. Hover over the button on a tile to open a Quick View of its records without leaving the page. Click a tile to jump to that list's tab. Each tile has its own refresh and, where they apply, action buttons.
- The record's own tab. The record's fields, grouped in sections. This is where you edit it after selecting in the header bar.
- Related list tabs. One tab for each kind of record that belongs to the selected one. The tab name shows the count.
Which related lists appear depends on the object you chose:
| Object | Related list tabs |
|---|---|
| Catalogs | Categories |
| Categories | Products, Child Categories, Category Qualifications, Category Disqualifications |
| Classifications | Products, Parent Products, Assigned Attributes, Subclassifications |
| Attribute Definitions | Attribute Categories, Product Classifications, Product Attribute Definitions |
| Attribute Categories | Attribute Definitions, Product Classifications, Product Attribute Definitions |
| Attribute Picklists | Attribute Picklist Values, Attributes |
| Selling Models | Product Selling Model Options |
| Products | Categories, Product Selling Model Options, Pricebooks, Product Component Groups, Child Components, Parent Products, Inherited Attributes, Overridden Inherited Attributes, Product Qualifications, Product Disqualifications, Usage Resources |
The usage and policy objects have their own, shorter sets of related lists in the same way. Some tabs only apply to certain records. For example, Product Component Groups and Child Components appear only for bundle products.
Paging through a related list
A related list shows five records at a time. The pager in the tab's title bar shows where you are, for example 1-5 of 23, and lets you:
- move between pages by number;
- change how many rows each page shows: 5, 10, 15, 20 or 50. A size is offered only when the list has more records than the next size down.
Some related list tabs add their own buttons to the title bar, such as assigning or removing records, adding a new related record, editing, sorting, or adding a product to a price book. Hover over a button to see what it does. As elsewhere, a button is grayed out when it does not apply or you do not have permission.
Creating and Editing Products
Products are the one object that does not use the plain edit form. Creating, cloning or editing a product opens the Smart Card, a single full-size window that shows the product's own fields next to everything that describes how it is sold. New products start with a short popup where you choose what kind of product you are building.
Choosing the product type
With Products selected in the List Source, click New. A popup asks for three things:
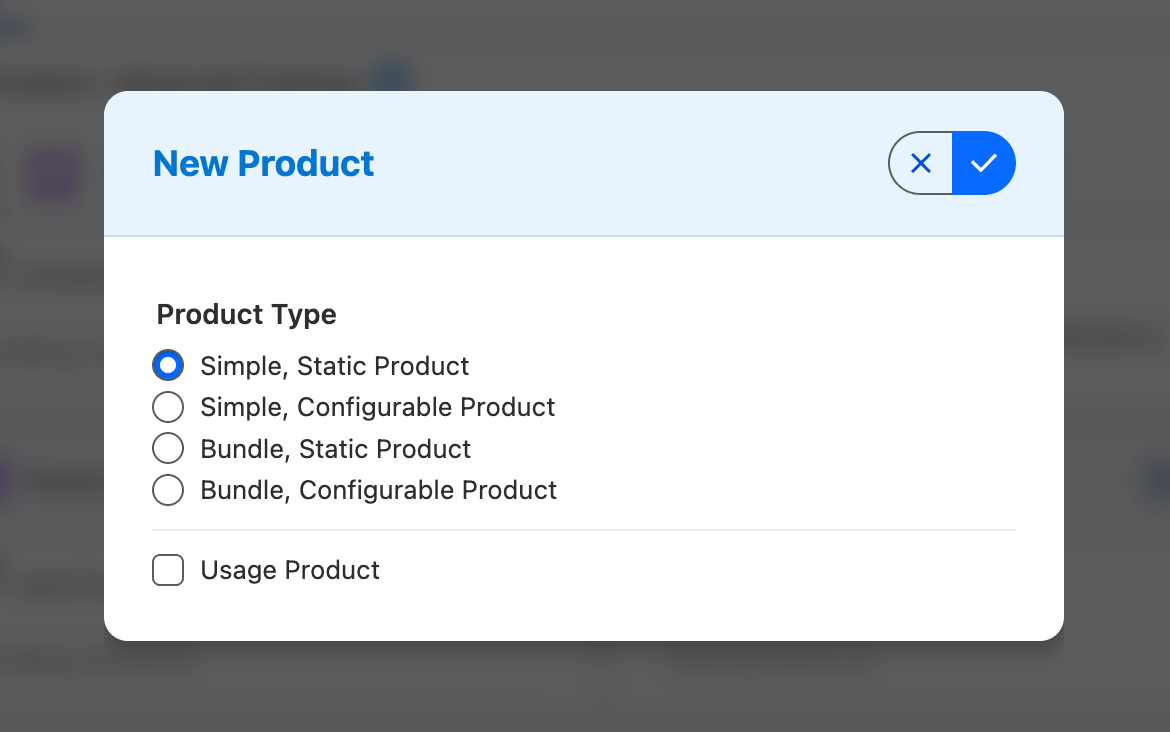
images/pcm-hub/new-product.pngThe New Product popup: record type, product type and usage- Record type. Shown only if you can create products with two or more record types. Proceed stays grayed out until you pick one.
- Product type. Choose one of four options. The choice presets the fields that decide how the product behaves, so you do not have to know which to set:
| Product type | Presets | Use it for |
|---|---|---|
| Simple, Static Product | Configure During Sale is Not Allowed | A single sellable item with nothing for the seller to choose. This is the default. |
| Simple, Configurable Product | Configure During Sale is Allowed | A single item the seller configures with attributes while quoting. |
| Bundle, Static Product | Type is Bundle, Configure During Sale is Not Allowed | A package of fixed child products that are added together. |
| Bundle, Configurable Product | Type is Bundle, Configure During Sale is Allowed | A package where the seller picks the components and their options. |
- Usage Product. Tick this for a product that is sold by consumption. It presets the Usage Model Type to Anchor.
Click Proceed to open the Smart Card, or to cancel. The presets are only a starting point, and you can change any of them in the Smart Card before saving.
A static bundle accepts only static child products, and they are added to the bundle by default. A configurable bundle lets you add any component and leave the seller to choose. Decide this before you start, because it controls what the Component Groups card allows.
The Smart Card
The Smart Card has two zones:
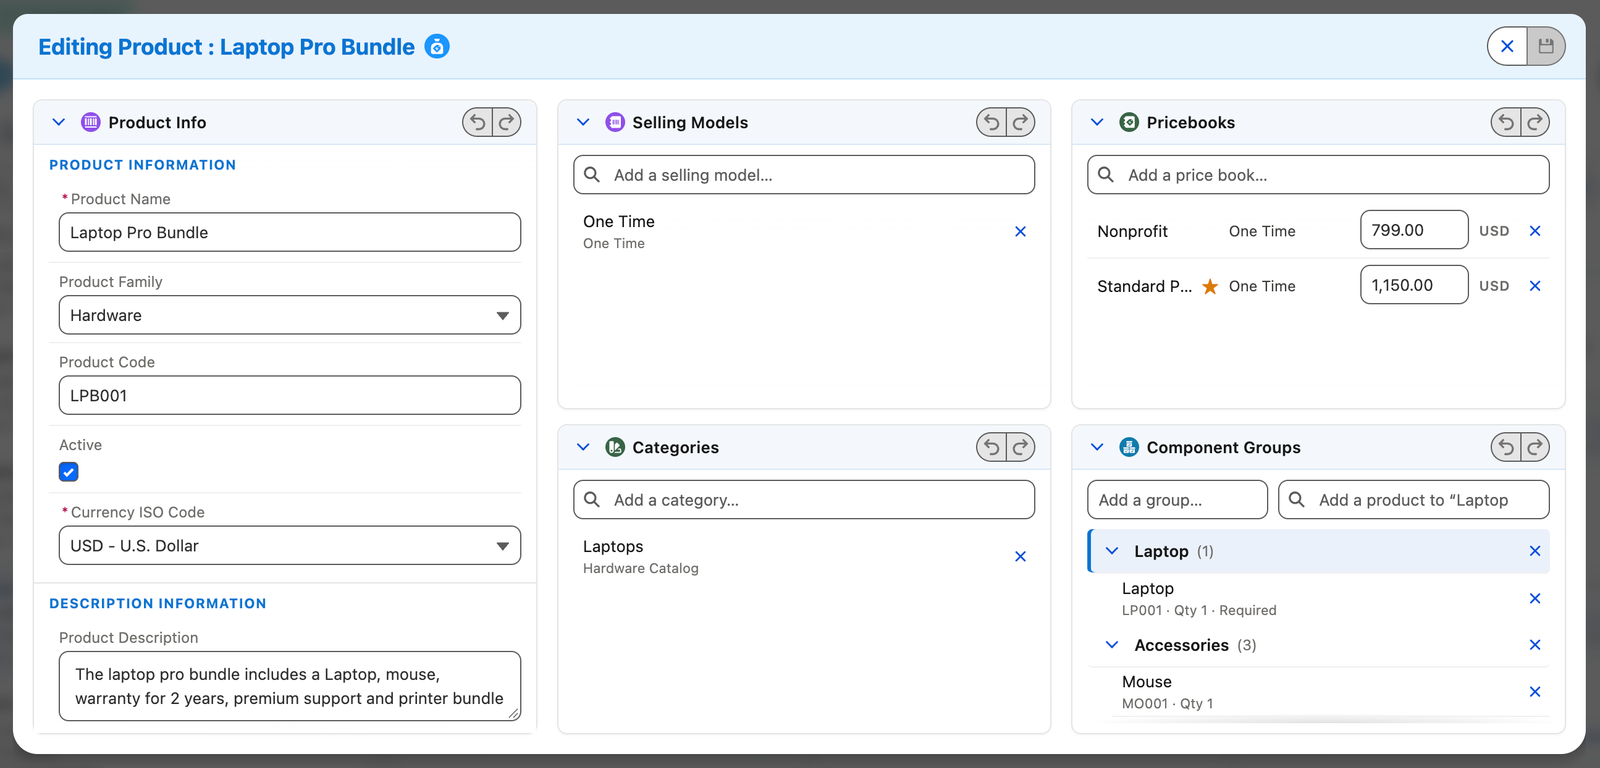
images/pcm-hub/smart-card.pngThe Smart Card on a bundle product, with Product Info on the left and the selling cards on the right- Product Info (left). The product's own fields, grouped into sections that follow the product page layout, such as Product Information and Description Information. Only fields you are allowed to set are shown, and required fields are marked with a red asterisk.
- How it's sold (right, top). Selling Models and Pricebooks side by side: add a model first, then price it.
- How it's sold (right, bottom). Categories, and for bundles Component Groups. For a product that is not a bundle, Categories uses the whole row.
- Header buttons. Close and Save. Save stays grayed out until you change something.
The window title tells you what you are doing: Creating Product, Cloning followed by the source product's name, or Editing followed by the product's name. A bundle shows a bundle icon beside the title. Nothing in the window scrolls as a page. Each card scrolls inside itself.
Every card has the same controls in its title bar:
| Control | What it does |
|---|---|
| Collapse | Folds the card down to its title so the other cards get the room. |
| N changes pill | Counts the unsaved changes in that card. |
| Steps back and forward through the changes in that card. Typing in one box counts as a single step. |
Changed fields in Product Info are highlighted, so you can see exactly what will be written before you save.
Entering a new product
- In Product Info, fill in the fields. Name is required. Product Code, SKU, Family, Based On, Configure During Sale, Assetizable and Active are alongside it, and the Usage section holds the Usage Model Type and units of measure.
- Type and Unit of Measure can only be set while creating. After the product is saved they are no longer offered when you edit.
- In Selling Models, search for a model, click it to add it, and repeat for each way you sell the product.
- In Pricebooks, add a price book, then set the price for each selling model and currency. The standard price is entered here too.
- In Categories, search and add the categories the product belongs in.
- For a bundle, in Component Groups, add a group, then pick the group and add the products that belong in it.
- Click Save.
The Smart Card saves everything as one operation, and a progress panel lists each step as it completes: the product first, then its models, prices, categories and components. If a step fails, the panel shows why and a Back to editing button returns you to the cards with your entries intact. When it finishes, click Done. The Smart Card closes, the left list reloads and the new product is selected.
Editing an existing product
Select a product and click Edit in the header bar. The Smart Card opens on that product in the same layout, with its current values loaded.
- Change fields in Product Info, add or remove selling models, price book entries, categories and components, and use the card's undo and redo as needed.
- Fields you do not have permission to update are left out, and a card you cannot change shows a short message instead of its fields.
- Save is enabled once something has changed. The progress panel runs the same way as for a new product, and when you click Done the right side refreshes with the saved values.
- Close leaves without saving. There is no click-away dismissal, so a stray click outside the window does not lose your work.
Cloning a Product
Cloning a product is a deep clone by default: it copies the product together with the records that hang off it, such as its categories, selling models, price book entries and components. Every kind of related record that exists on the original is ticked to start with. Before anything is copied, PCM Hub lets you untick the ones you do not want, then reports on each one as it is copied.
Choosing what to copy
Select a product and click Clone in the header bar. A popup titled Cloning Product followed by the product's name opens:
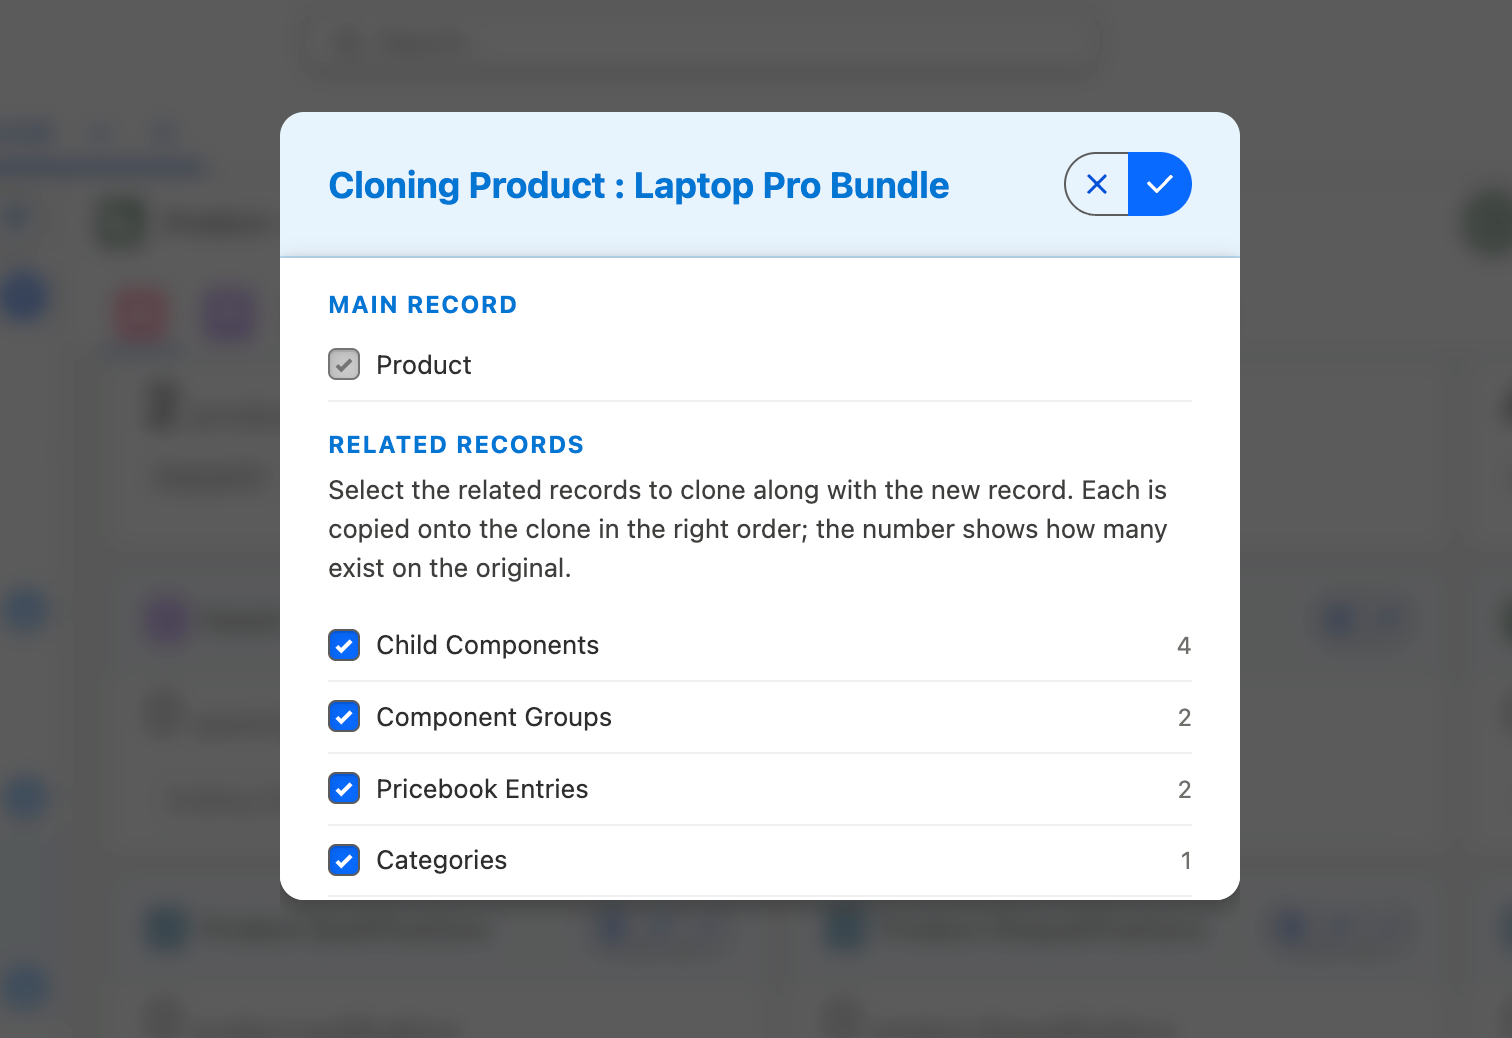
images/pcm-hub/clone-select.pngThe clone chooser, listing the related records that can be copied with the product- Main Record is always ticked and cannot be changed. It is the product itself.
- Related Records lists each kind of related record with a count of how many exist on the original product. The kinds are:
- Categories
- Selling Model Options
- Pricebook Entries
- Component Groups
- Child Components
- Overridden Attributes
- Qualifications
- Disqualifications
- Usage Resources
- Kinds that have records are ticked to start with, and listed first, highest count first. Kinds with none are grayed out and listed below.
- Two choices depend on another. Pricebook Entries need Selling Model Options, and Child Components need Component Groups. Ticking the dependent one ticks the one it needs, and clearing the one it needs clears the dependent one.
Click Proceed to continue, or to cancel without cloning anything. If the product has no related records at all, the chooser is skipped and you go straight to the next step.
Reviewing the copy
Proceed opens the product in the Smart Card with the title Cloning followed by the source product's name. It is filled in with the original's field values, and with the categories, selling models, price books, component groups and components you ticked, so you can change any of them before you save. Unlike a new product, a clone can be saved straight away without a change. See Creating and Editing Products for how the cards work.
Qualifications, disqualifications, overridden attributes and usage resources are not shown in the Smart Card. They are copied automatically right after the product is saved.
Watching the copy run
Saving happens in two stages.
- The Smart Card save. When you click Save, the product and everything shown in the Smart Card (fields, selling models, price books, categories and components) are saved together as one operation. A progress panel lists each step as it completes. If anything fails here, nothing is created, and Back to editing returns you to the cards.
- The remaining related records. If you ticked qualifications, disqualifications, overridden attributes or usage resources, a second progress panel then copies them onto the new product:
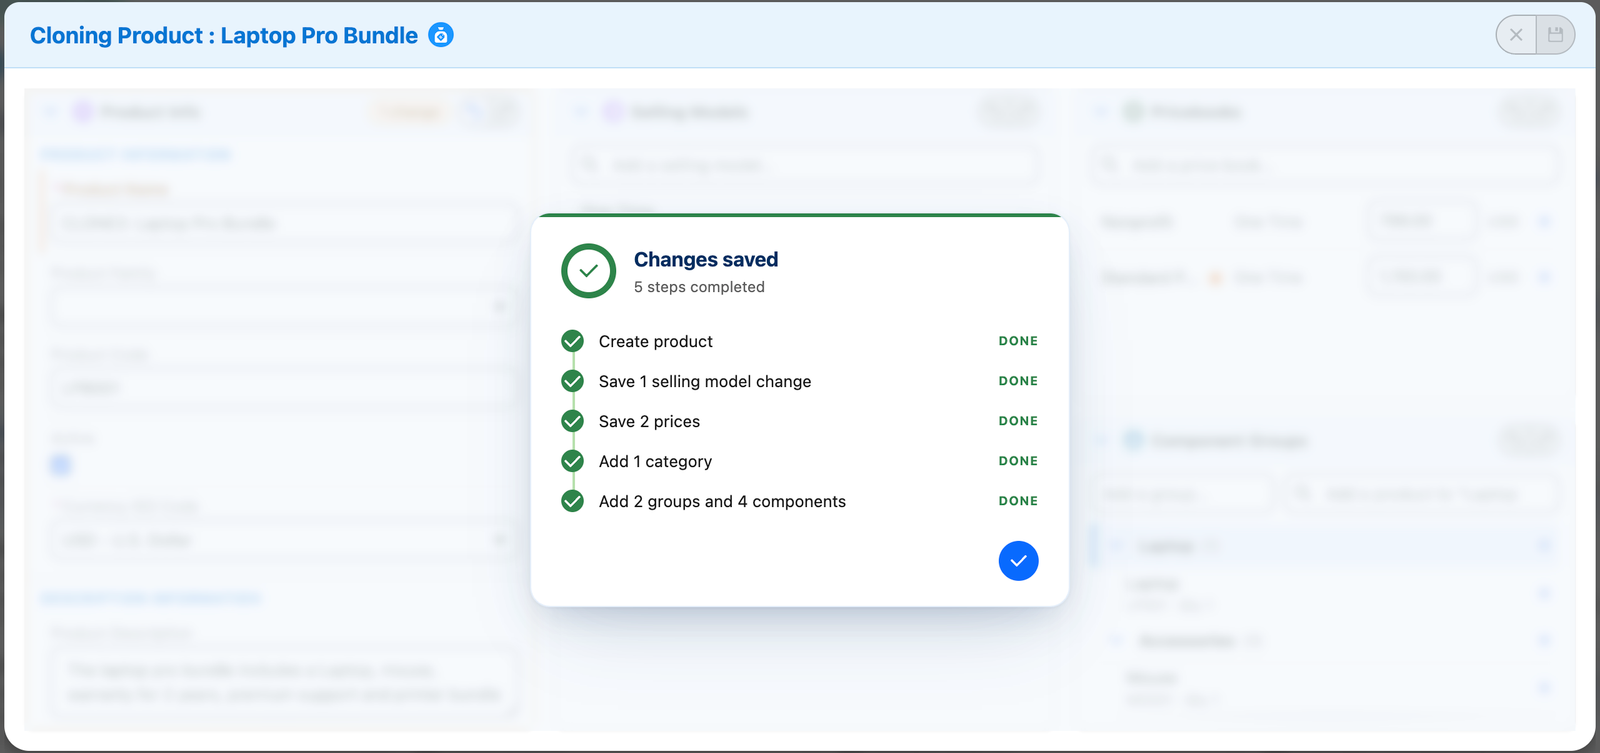
images/pcm-hub/clone-progress.pngThe clone progress panel, with one line per relationship- The ring and bar show how many steps have finished, for example 3/5.
- The first line is the product itself. Below it is one line for each relationship, marked Saving while it runs and Done when it completes, with the number of records it saved.
- Each relationship is its own step, run in order.
When every step succeeds, the panel reads Product cloned with the number of steps completed. Click Done: the left list reloads and the new product is selected. If you ticked none of those four, the second panel does not appear, and the Smart Card's Done selects the new product.
If a step fails
In the second stage, one relationship failing does not undo the others. The panel changes to Clone partially saved and shows how many steps did not save, with the reason for each. A step that depends on a failed one is marked Not run. You then choose:
| Button | What it does |
|---|---|
| Keep As Is | Keeps the clone with whatever was copied. The new product is selected so you can fix the rest by hand. |
| Roll Back All | Removes the clone and every related record that was copied. The panel shows Rolling back while it works, and the list reloads without the clone. |
If you choose Keep As Is, open the clone's related list tabs and compare them with the original before you use it. A relationship that failed will be missing or incomplete.
Sending Feedback
Click Send Feedback in the header bar to report a bug, request a feature or share feedback with Clerisoft without leaving PCM Hub. Choose the app or apps and the kind of feedback, write your message, and send it. Your name, role, profile and org details are added for you, and you are copied on the email.
The full steps and what is sent are in the Sending Feedback guide.