
Overview
Deal Packages lets your team build reusable, pre-approved product packages once, each made up of products (including bundles) with pre-configured quantities, discounts and attributes, then apply them to a Quote fully priced and configured.
Make sure you can create and edit Quotes and add products to a Quote. Deal Packages works on top of those abilities, so if you don't have enough access or permissions to do them, you won't be able to use the app. Please reach out to your system administrator for additional assistance.
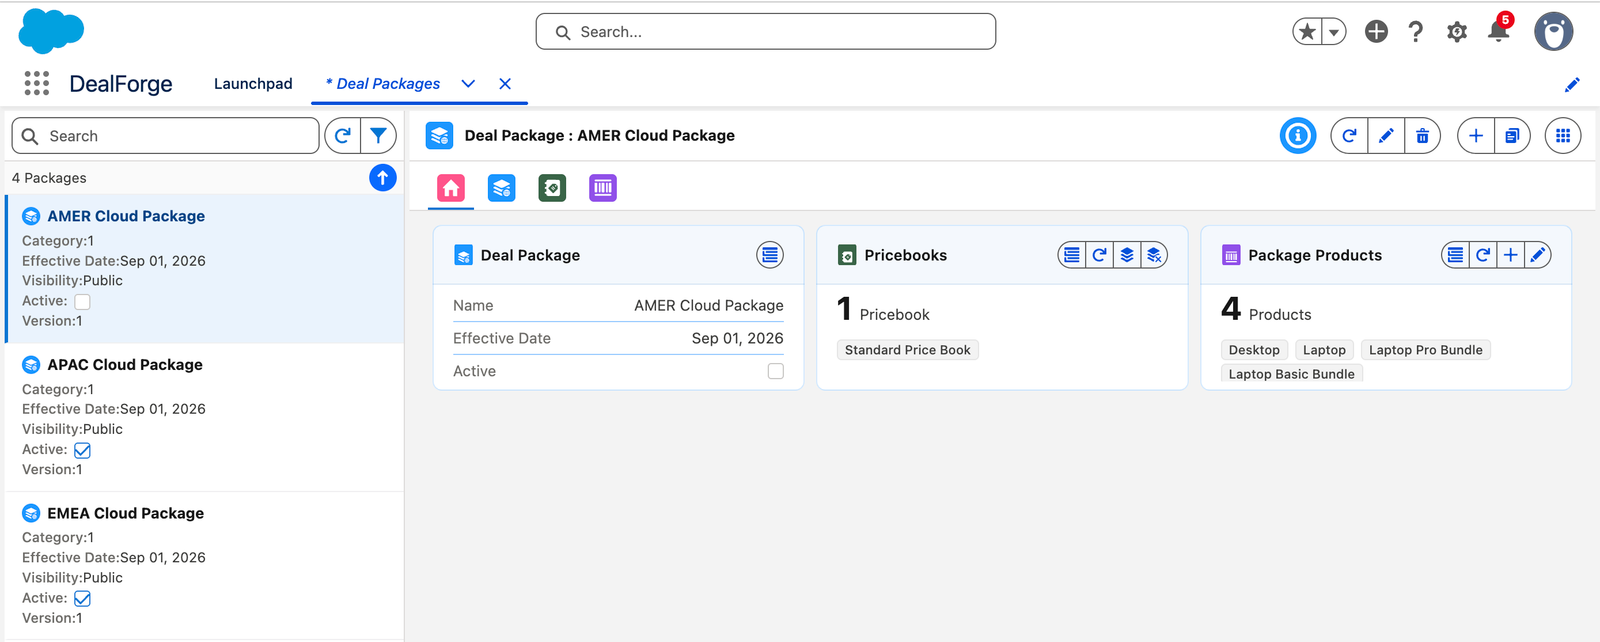
images/deal-packages/overview.pngDeal Packages overviewWhy Use Deal Packages
- Create reusable templates for standard deals. Package the combinations you sell most often and use them again and again.
- Preselect products, bundles, discounts and attributes. They come ready on the package instead of being added one by one.
- Apply to any quote and build instantly. Apply a package to any quote in one click and have it built for you.
User Personas
| Persona | What they do |
|---|---|
| Sales Admin | Builds, prices and activates reusable deal packages. |
| Sales Representative | Loads a package into a Quote or Order instead of adding products one by one. |
| Product and Pricing Manager | Decides which price books and products a package uses. |
| Sales Operations | Standardizes the bundles and starter kits the business quotes often. |
| Sales Manager | Reviews which packages are available and keeps them current. |
App Layout
Deal Packages opens as a two-pane workspace: a package list on the left and the selected package on the right.
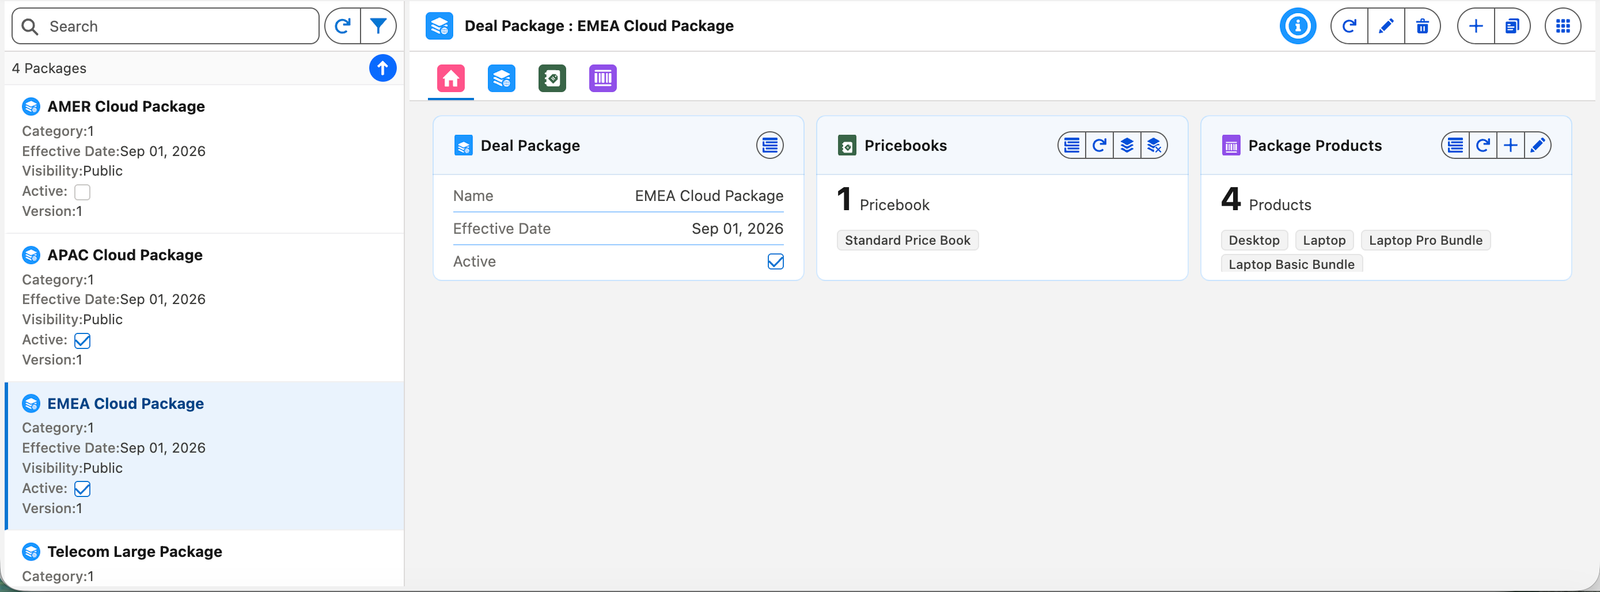
images/deal-packages/app-layout.pngThe Deal Packages workspace, with each area numbered below- Header bar. Shows the app icon and the title Deal Package : EMEA Cloud Package for the selected package. The action buttons on the right are listed under Header bar actions.
- Search box. Type to narrow the package list by name. Use the clear (x) icon inside the box to reset it.
- Refresh and filter. Next to the search box, a connected pair of buttons reloads the list and opens the filter panel. Use the filter panel to build your own criteria (a field, an operator and a value; add as many conditions as you need) or to apply, edit, save or delete a saved list view. See the List Views guide.
- Result count and sort. A line under the toolbar shows how many packages match. The sort button beside it toggles between ascending and descending order.
- Package list. Each package is a tile with its name and key details. Click a tile to open that package in the right panel. The list is locked while you are editing so changes are not lost.
- Tabs. The right panel has four tabs: Overview (a read-only summary), Deal Package (the package and version details), Package Price Books and Package Products.
- Right panel. The content area under the tabs. On the Overview tab it shows summary cards for the Deal Package, its Pricebooks and its Package Products, each with its own action buttons in the card header. The other tabs show the full package details, price books and product lines.
Header bar actions
The buttons in the header bar act on the selected package. Hover over any button to see its tooltip. A button is grayed out when it does not apply, for example when you do not have permission or the license is blocked.
| Icon | Action | What it does |
|---|---|---|
| Guidance | Opens app-specific guidance for using Deal Packages. | |
| Refresh | Reloads the selected package from the server. | |
| Edit | Switches to edit mode so you can make changes to the package. | |
| Delete | Permanently deletes the package after you confirm. This cannot be undone. | |
| New | Creates a new Deal Package from scratch. | |
| Clone | Creates a copy of the package to start a new one. | |
| Send Feedback | Opens a form to report a bug, request a feature or share feedback with Clerisoft. See Sending Feedback. | |
| App launcher | Hover to see every DealForge app and jump to any of them. |
Package list actions
| Icon | Action | What it does |
|---|---|---|
| Search / clear | Filters the list as you type; clear empties the box. | |
| Refresh | Reloads the package list from the server. | |
| Filter | Builds custom criteria to filter the list, or applies a saved list view. The button changes appearance when a saved list view or an unsaved quick filter is active, and you can click it to change or clear. | |
| Sort | Toggles the list between ascending and descending order. |
Package Products tab actions
| Icon | Action | What it does |
|---|---|---|
| Refresh | Reloads the latest products and price books for this package. | |
| Add Product | Searches for and adds one or more products to the package. | |
| Edit Product Lines | Edits quantity, selling model or discount for every product at once. | |
| Previous / next price book | Switches between the price books assigned to the package. | |
| Row actions | Opens the menu for one product row (see below). |
The row actions menu offers:
| Icon | Action | What it does |
|---|---|---|
| Attributes | Sets per-product attribute values such as options and specifications. | |
| Edit | Edits that row's quantity, selling model and discount. | |
| Sync Bundle | Bundle products only. Brings the bundle in line with the current catalog, adding any missing components with default quantity and pricing. | |
| Delete | Removes the product from the package after you confirm. |
Package Price Books tab actions
| Icon | Action | What it does |
|---|---|---|
| Refresh | Reloads the latest products and price books for this package. | |
| Assign Price Books | Links one or more price books to the package. | |
| Unassign Price Books | Removes one or more price books from the package. |
Using List Views
Click Filter beside the search box to narrow the package list. You can filter on package name, version, price book and the products a package contains, then apply the filter once or save it as a list view to reuse. Administrators can make a view Public so the whole team can apply it.
The full steps, the operators for each field and the difference between a saved view and a quick view are in the List Views guide.
Creating a Deal Package
New packages are built in the Smart Card, a single popup where you set up the package, its price books and its products in one go. Edit and Clone open this same Smart Card, filled in with the existing package's data, so everything below also applies when you change or copy a package.
| Opened from | Smart Card title | What happens |
|---|---|---|
| New | Creating Deal Package : New | Starts blank. |
| Edit | Editing Deal Package : name | Loads the package so you can change any of its details, price books or products. Only the fields you change are saved. |
| Clone | Cloning Deal Package : name | Starts from a copy of the package, including its price books and products. The copy is always created inactive, and non-admins cannot clone it as Public. |
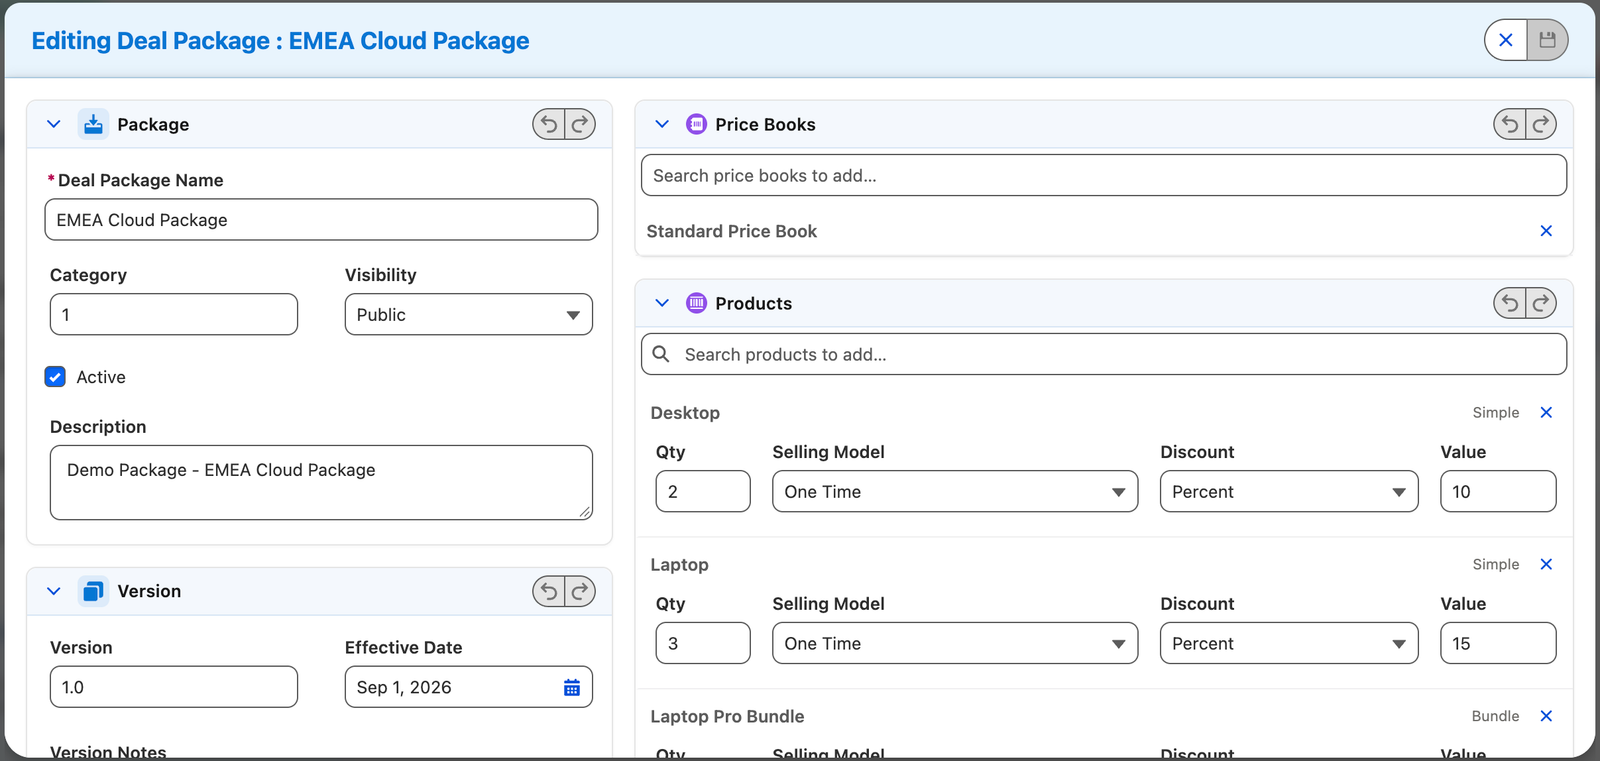
images/deal-packages/smart-card.pngThe Deal Package Smart CardNothing is saved until you click Save, and you can leave at any time with Cancel.
| Icon | Action | What it does |
|---|---|---|
| Cancel | Closes the Smart Card without saving. | |
| Save | Saves everything in one go. Available once there is a change and the package has a unique name. |
Step 1: Open the Smart Card
Click New in the header bar. The Smart Card opens with the package details on the left and the price books and products on the right.
Step 2: Enter the package details
The left side has two cards.
Package
| Field | Notes |
|---|---|
| Deal Package Name | Required. The name must be unique. The Smart Card checks it as you type and warns you if it is already used. |
| Category | Optional. Groups packages (the product family). |
| Visibility | Private (only you) or Public (every Deal Packages user). Only admins can choose Public. |
| Description | Optional. |
Version
| Field | Notes |
|---|---|
| Version | The package version number. |
| Effective Date | The date the package takes effect. |
| Version Notes | Notes about what changed in this version. |
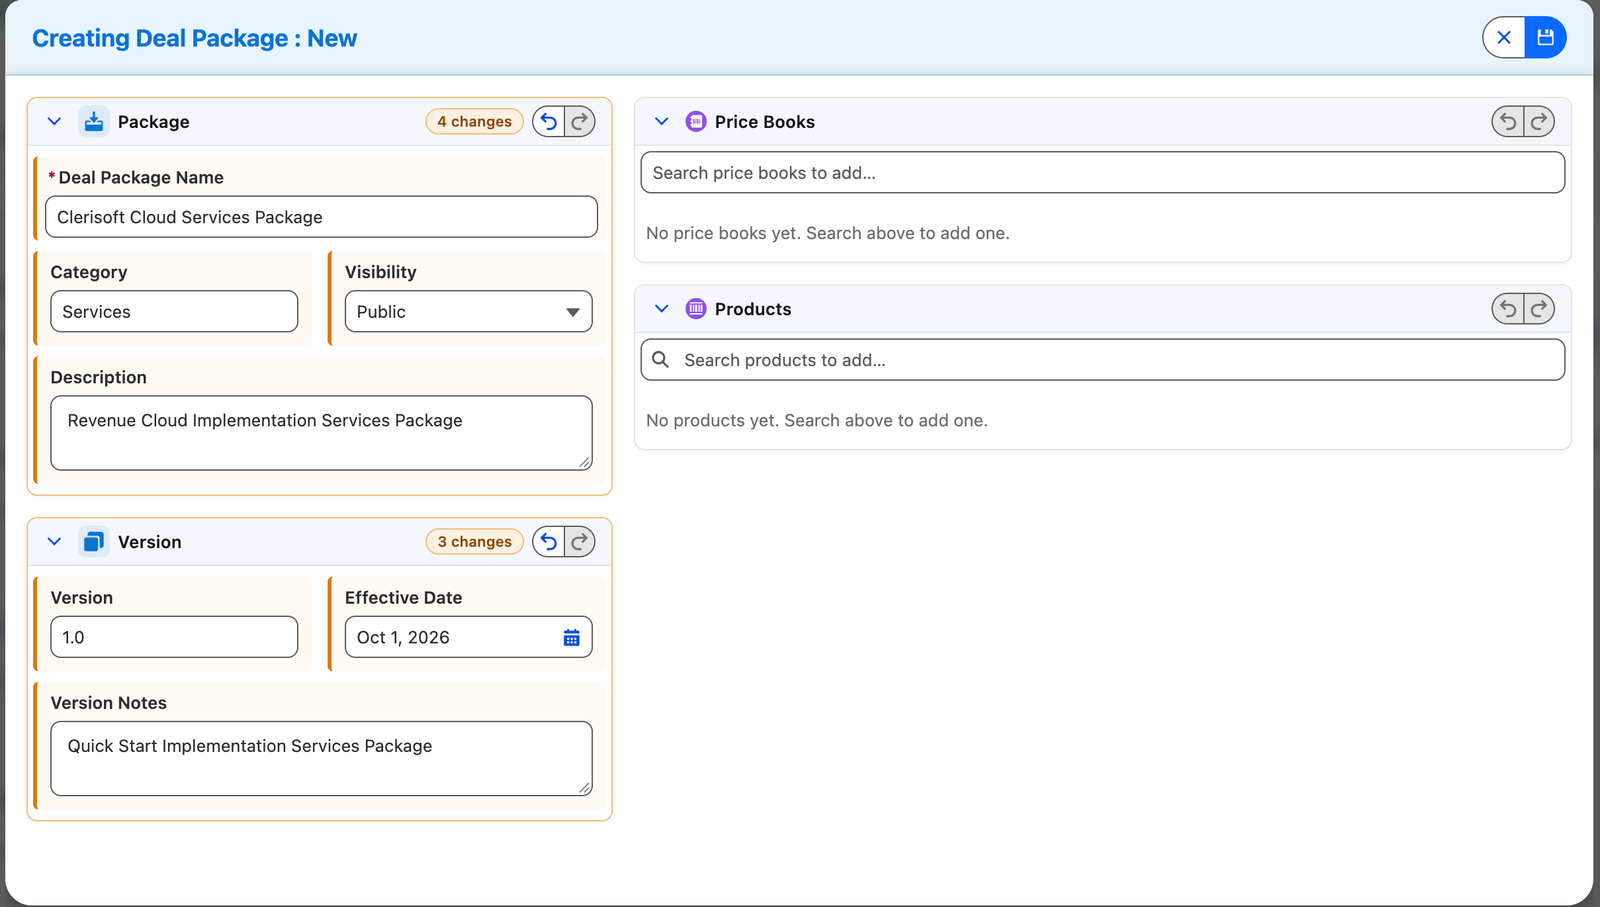
images/deal-packages/create-details.pngPackage and Version cardsStep 3: Add price books
In the Price Books card, search for a price book and select it to add it. Added price books appear as rows; click the on a row to remove it before saving. A package is quoted under the price books assigned to it.
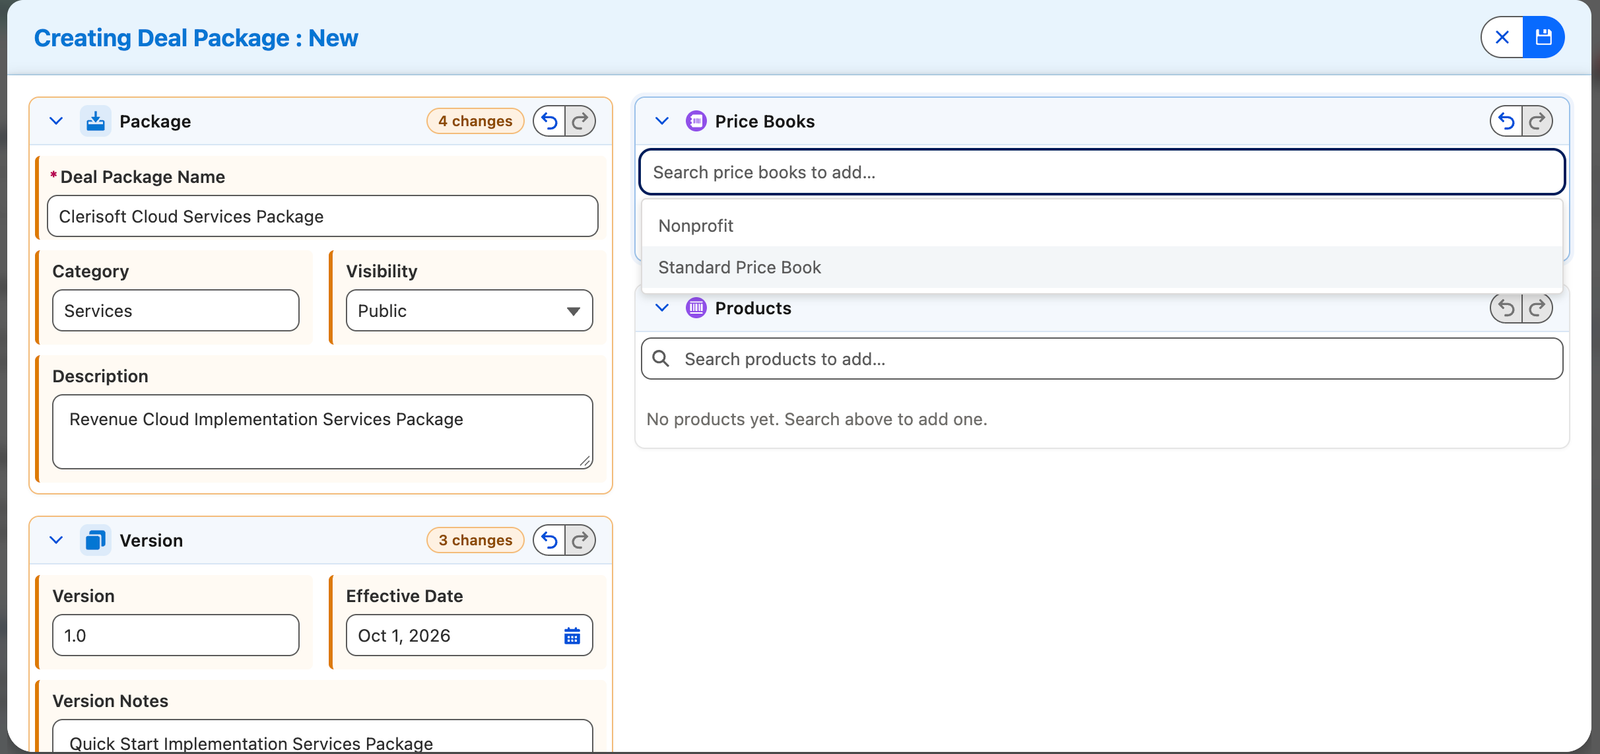
images/deal-packages/create-pricebooks.pngAdding price booksStep 4: Add products and set quantities and discounts
In the Products card, type at least two characters to search for products, then select a product to add it. Search results show the product type (Simple or Bundle) and its catalog and category. Each product you add appears as a row with these fields:
| Field | Notes |
|---|---|
| Qty | Quantity. A new product starts at 1. |
| Selling Model | The selling model for the product. It is preselected when the product has a default or only one option. |
| Discount | None, Percent or Amount. |
| Value | The discount amount. Available once you choose Percent or Amount. |
Click the on a row to remove a product you have not saved yet. Bundle products bring their child products with them automatically.
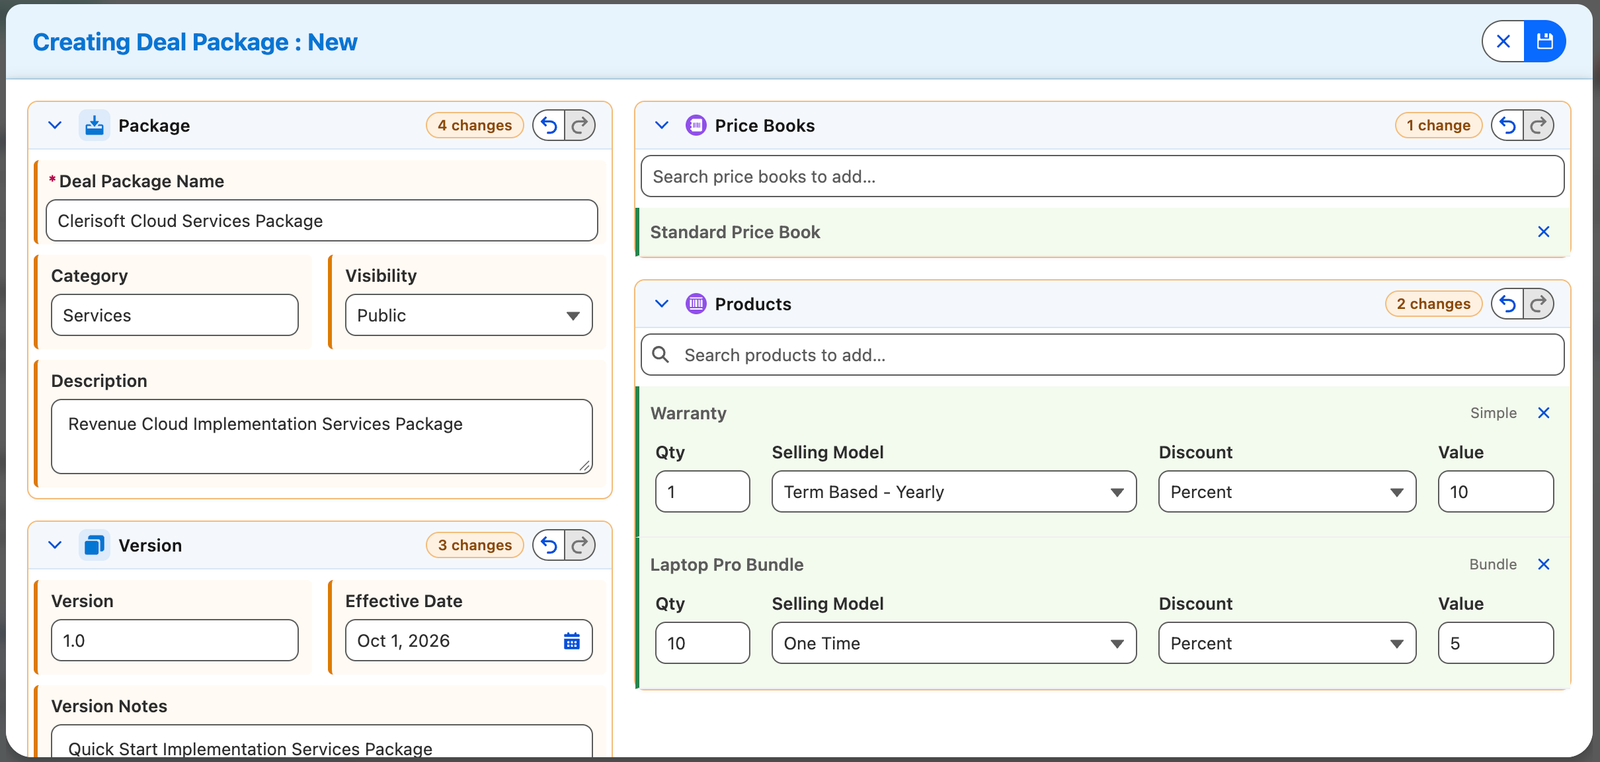
images/deal-packages/create-products.pngAdding products with quantity, selling model and discountStep 5: Save the package
Click Save. A progress panel lists each step as it happens (creating the package, assigning price books, adding products) and shows Done when it finishes. All changes are saved in a single transaction. If something fails, nothing is saved, your edits are kept, and you can click Back to editing to correct the highlighted fields.
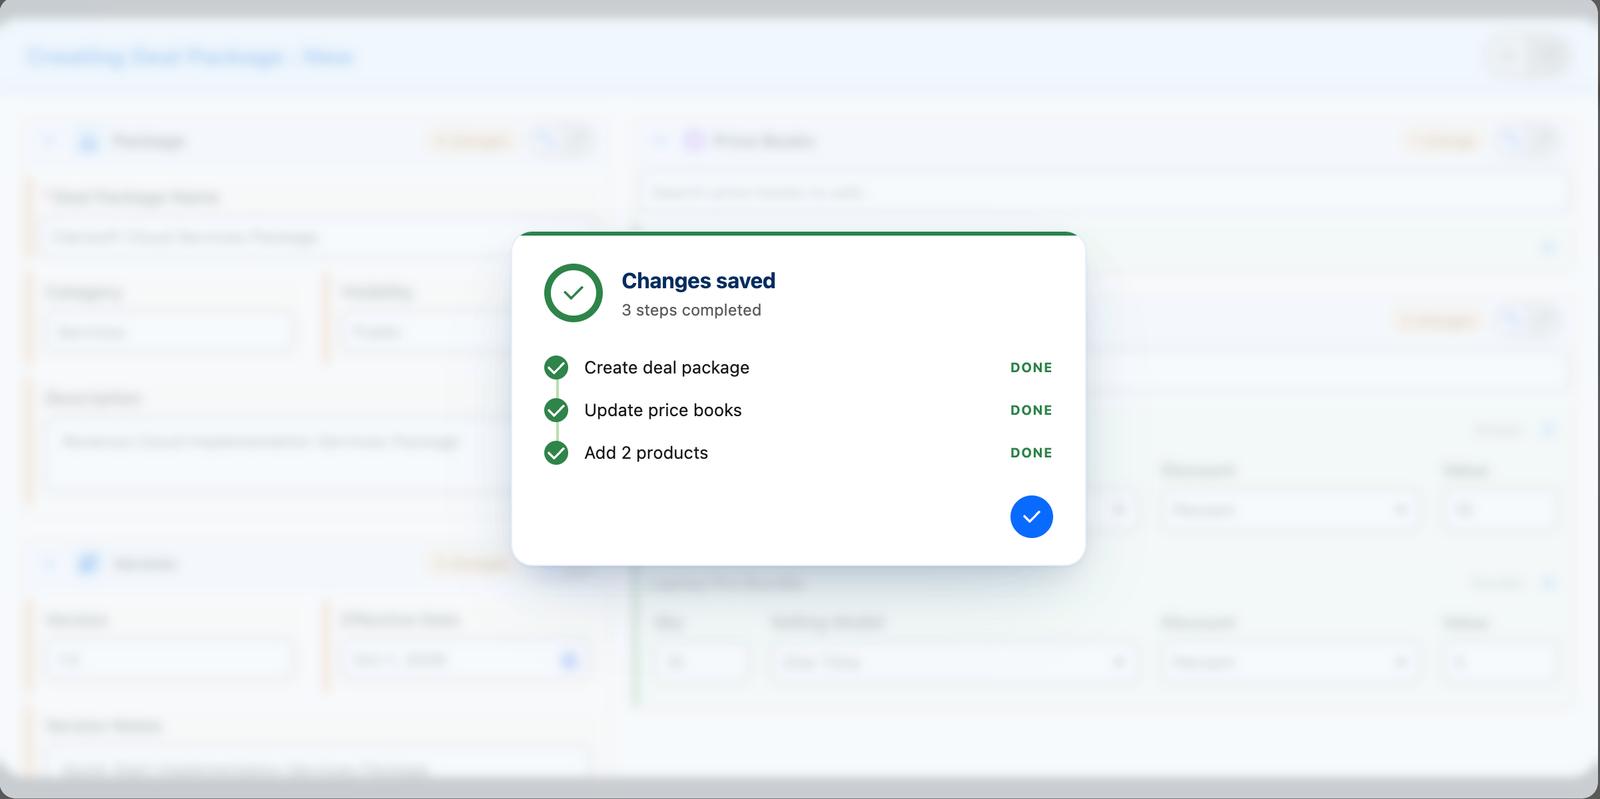
images/deal-packages/create-save-progress.pngSave progressThe new package appears in the package list on the left. New packages are created inactive.
Step 6: Set attributes on a product
Attributes (for example options and specifications) are set per product once the package exists.
- Open the package and select the Package Products tab.
- On the product's row, open the row actions menu and choose Attributes.
- Set the attribute values in the dialog and apply them. A confirmation message appears when the attributes are updated.
If the product has no attributes defined, the dialog says so. Attributes is available on every product row, and it is turned off if you do not have permission to update product lines.
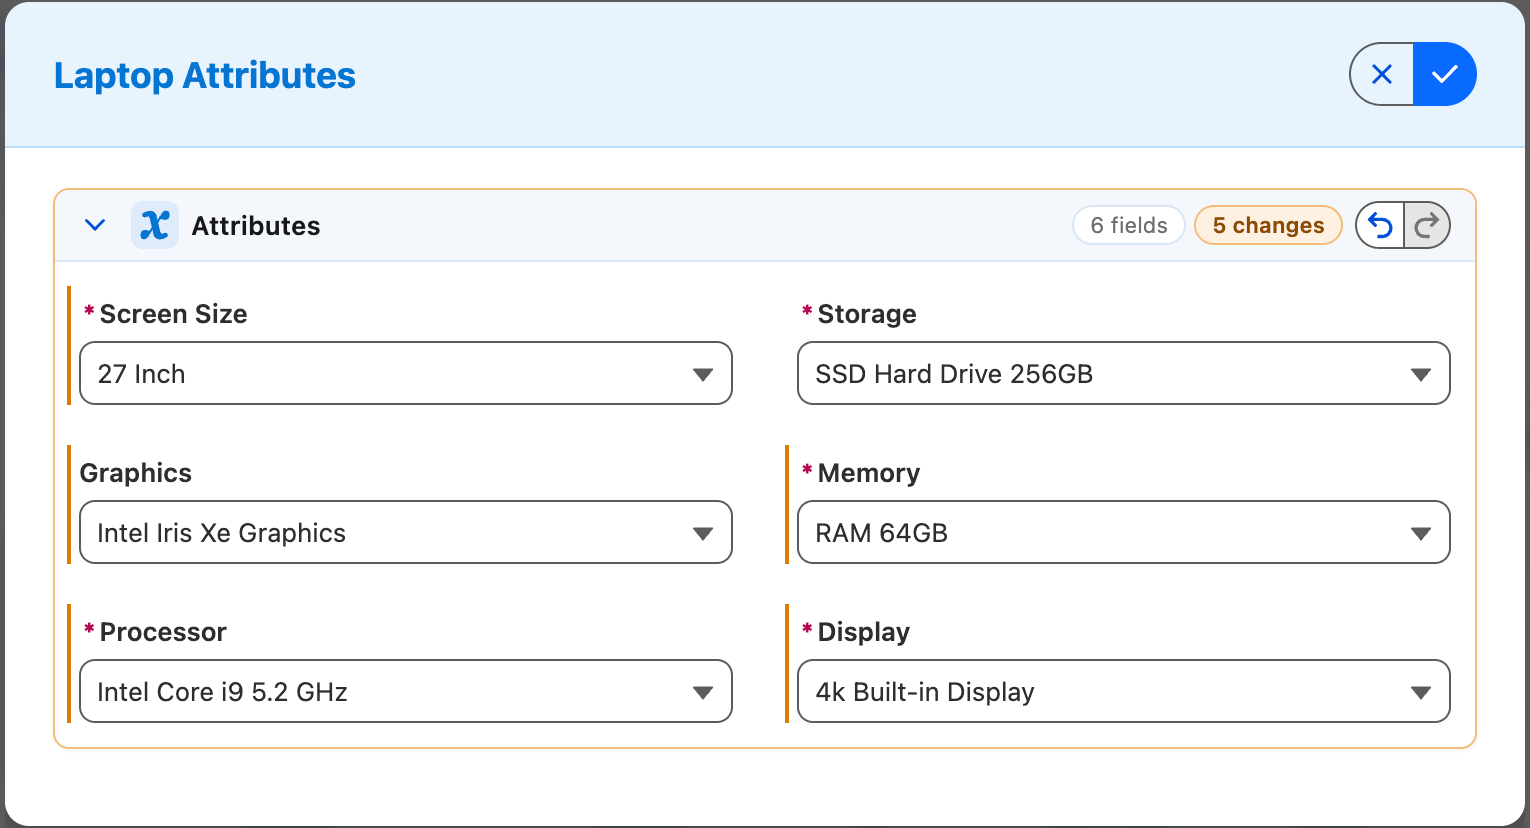
images/deal-packages/attributes.pngSetting attribute values for a productStep 7: Adjust quantities and discounts later
To change quantity, selling model or discount after saving, use the Package Products tab. Choose Edit Product Lines to change every product at once, or Edit in a row's actions menu to change just that product. You can also reopen the Smart Card with Edit in the header bar.
Step 8: Activate the package
Reps can only apply a package that is active and whose Effective Date is today or earlier; a package with a future Effective Date stays out of the quote selector until that date. To activate it:
- Select the package in the list and click Edit in the header bar.
- In the Package card, tick Active. (This checkbox appears only when editing; new and cloned packages always start inactive.)
- Click Save.
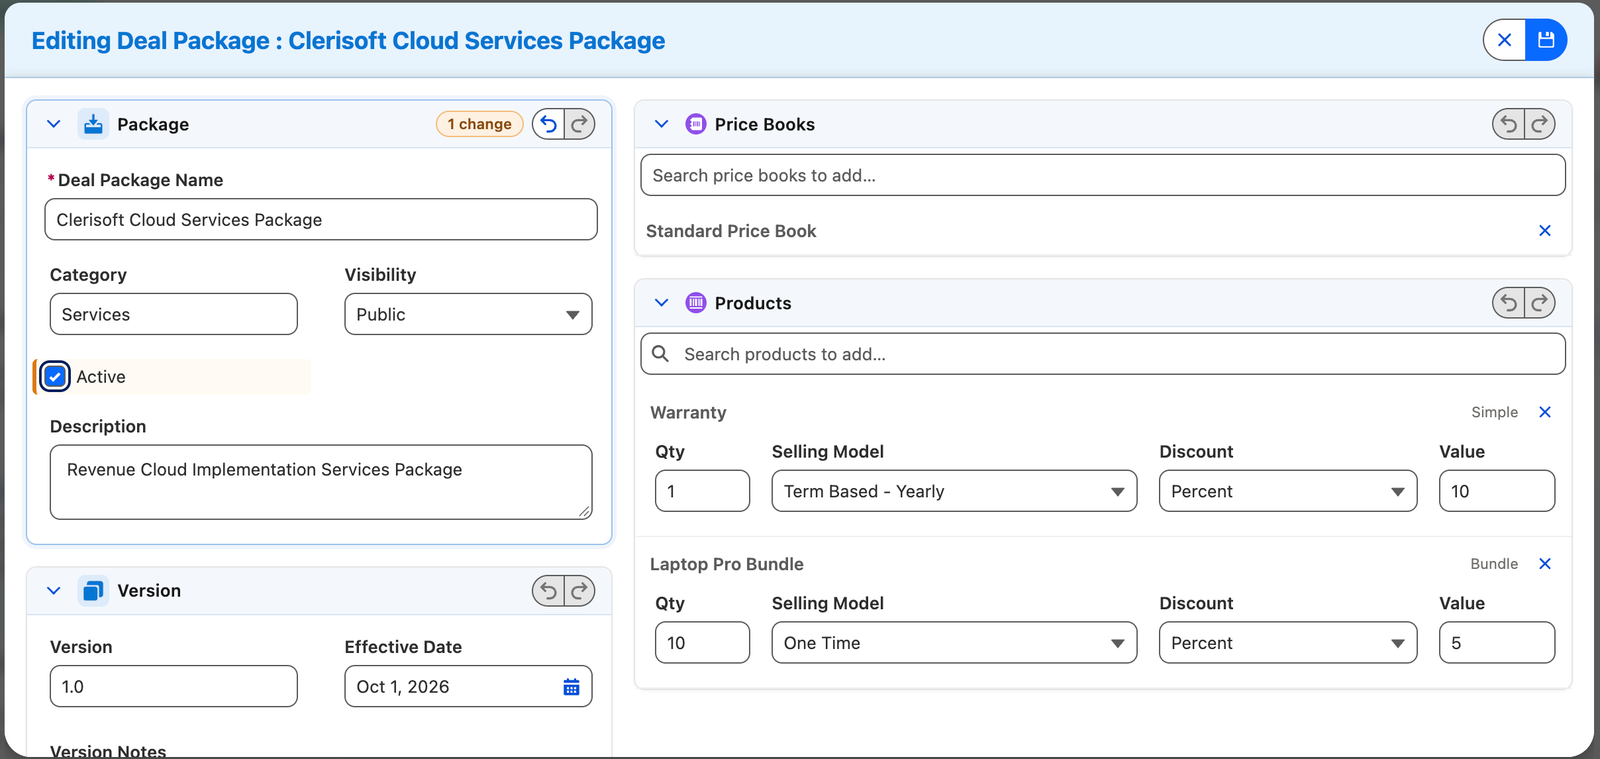
images/deal-packages/activate.pngTicking Active on the Package cardUntick Active and save again to take a package out of use without deleting it.
Adding a Package to a Quote
Reps add packages to a quote with the Browse Packages action on the Quote record. It opens the Deal Package Selector over the quote, where you find a package, review what it contains and load it onto the quote. Only packages that are active and have an Effective Date of today or earlier are listed.
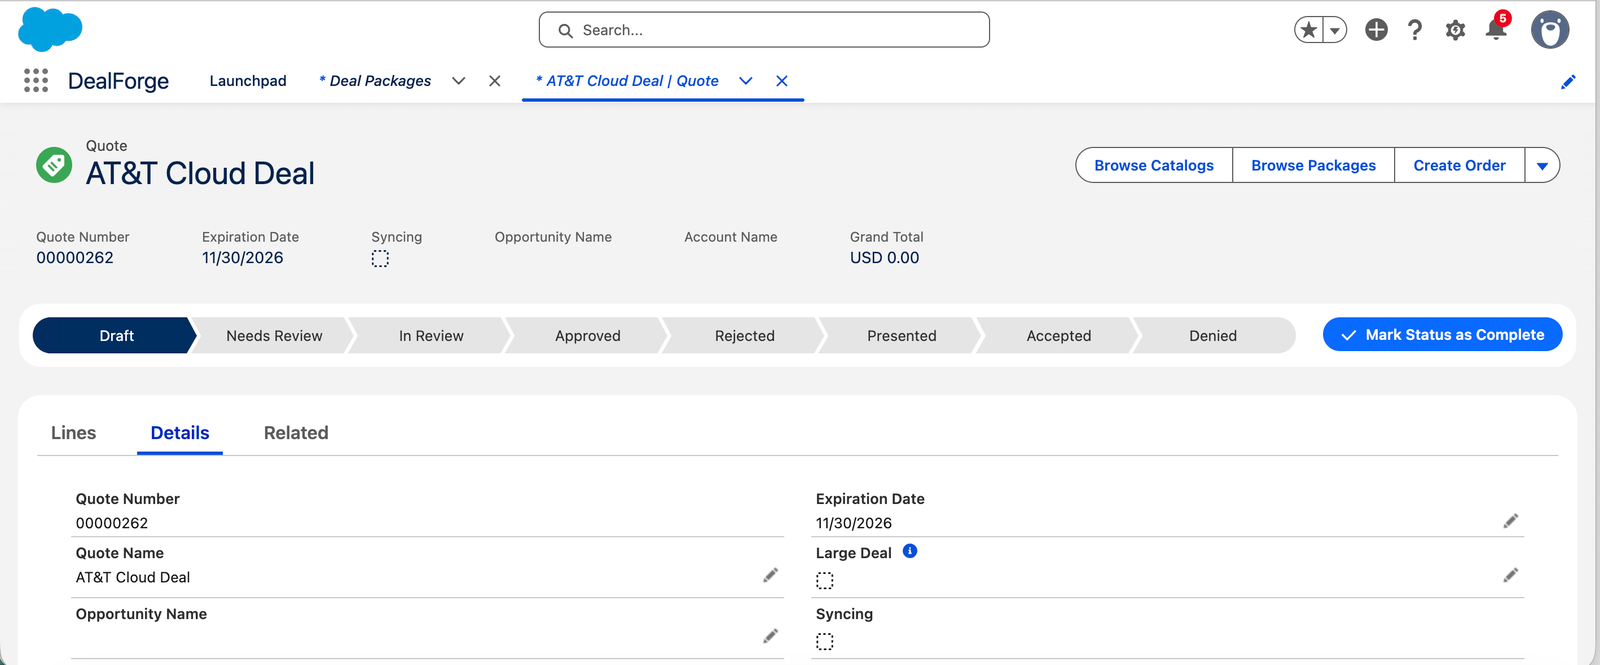
images/deal-packages/quote-browse-action.pngThe Browse Packages action on a QuoteStep 1: Open the Deal Package Selector
- Open the Quote you want to add products to.
- Choose Browse Packages from the record's actions.
- The selector checks your DealForge license first. If it is not valid, a blocked message explains why instead of the package list.
Step 2: Choose a price book (only if the quote has none)
If the quote does not have a price book yet, you are asked to pick one before browsing. A quote can use products from a single price book only.
Changing the price book on a quote deletes all existing products from that quote. Pick the right one before you load a package.
Select a price book and click Save to continue.
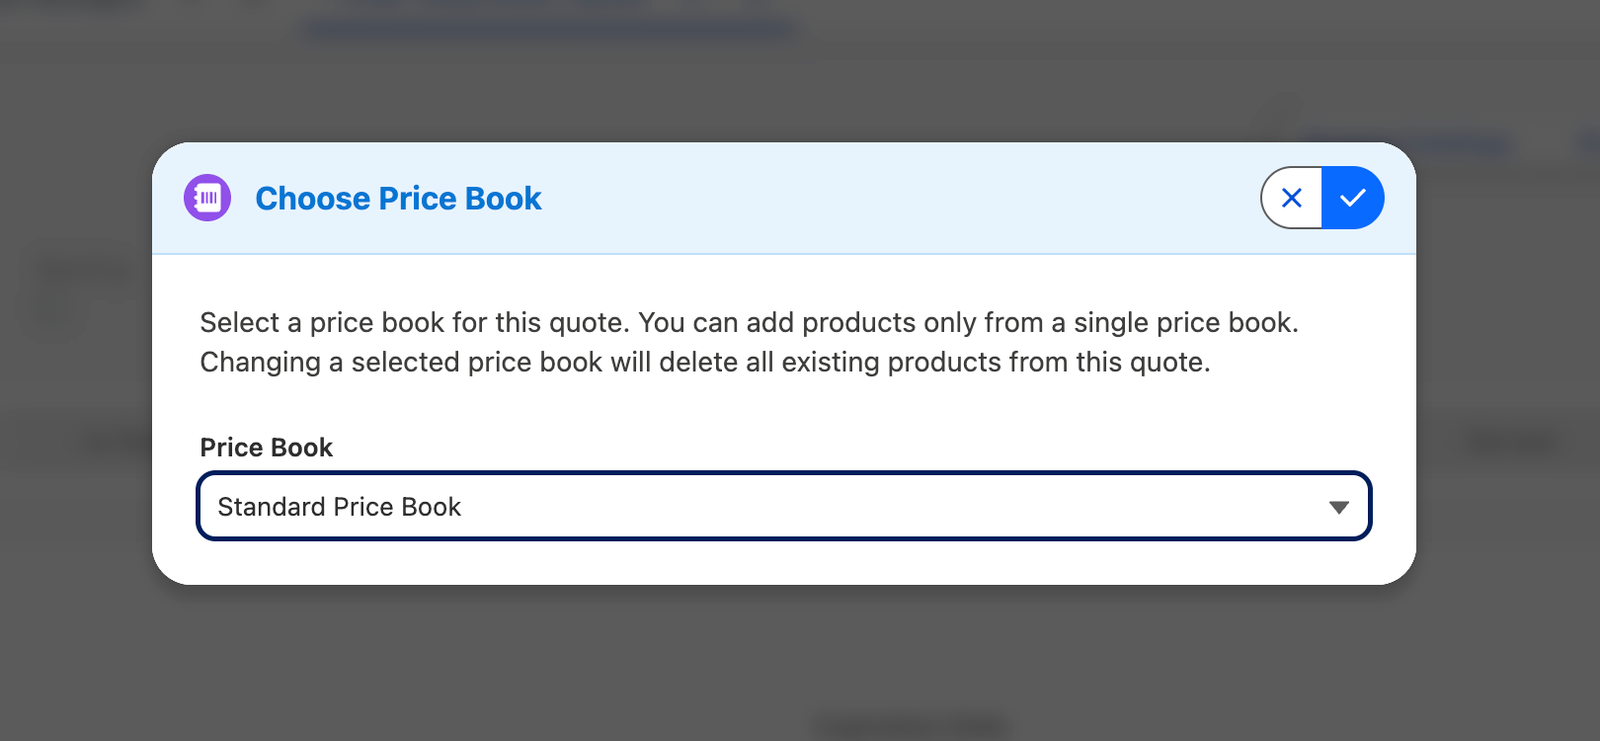
images/deal-packages/quote-choose-pricebook.pngChoosing a price book for the quoteStep 3: Find a package
The selector lists active packages in a table.
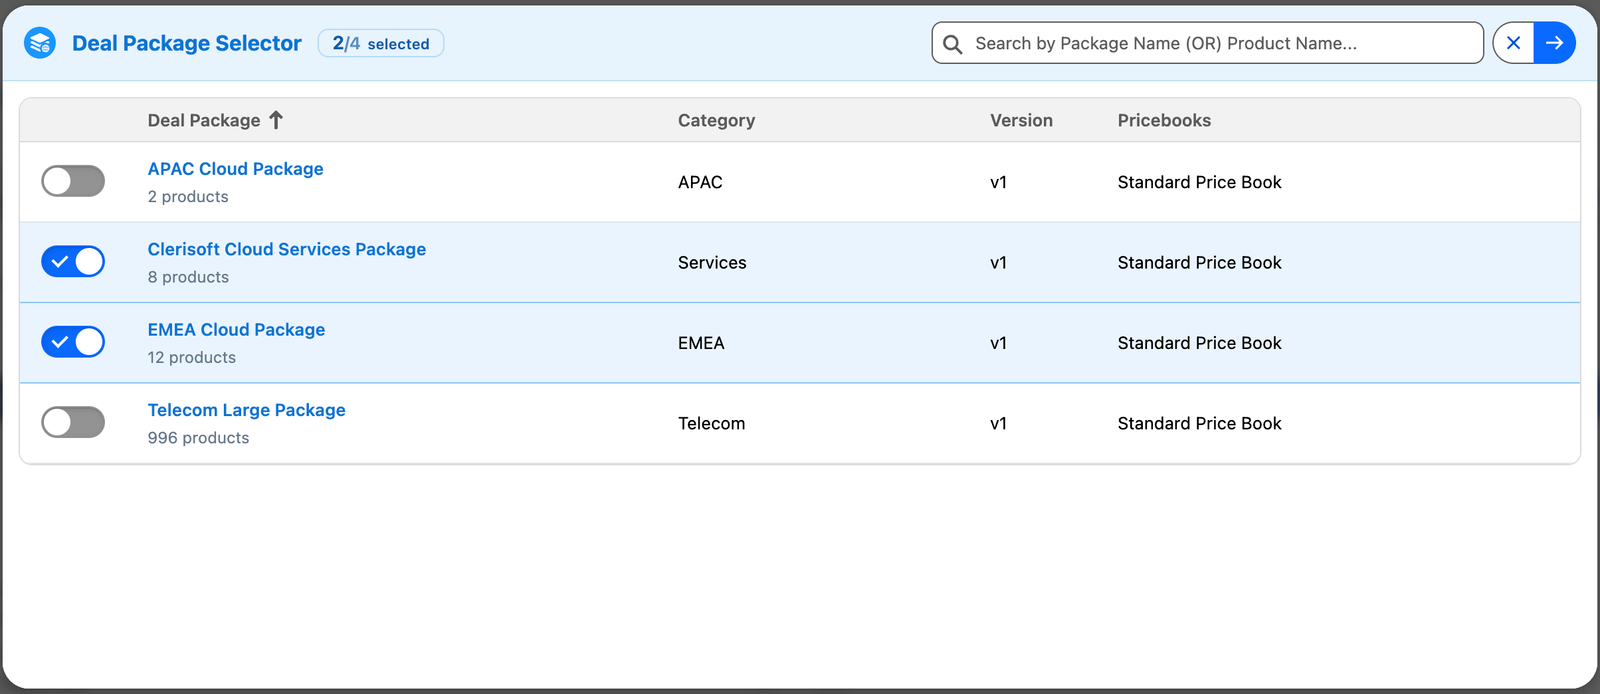
images/deal-packages/quote-selector.pngThe Deal Package Selector| Column | What it shows |
|---|---|
| Toggle | Select the package. You can select more than one. |
| Deal Package | The package name. Click the heading to sort. |
| Category | The package category. Click the heading to sort. |
| Version | The package version. |
| Price Books | The price books the package is available under. |
- Search by package name or product name in the search box at the top. Use to reset it.
- The header shows how many packages you have selected. If a search is active it also shows how many selected packages fall outside the search.
- Click a row to select it, or use its toggle.
| Icon | Action | What it does |
|---|---|---|
| Cancel | Closes the selector without changing the quote. | |
| Next | Moves to the review step with the packages you selected. |
Step 4: Review the package contents
After Next, you see the selected package in detail.
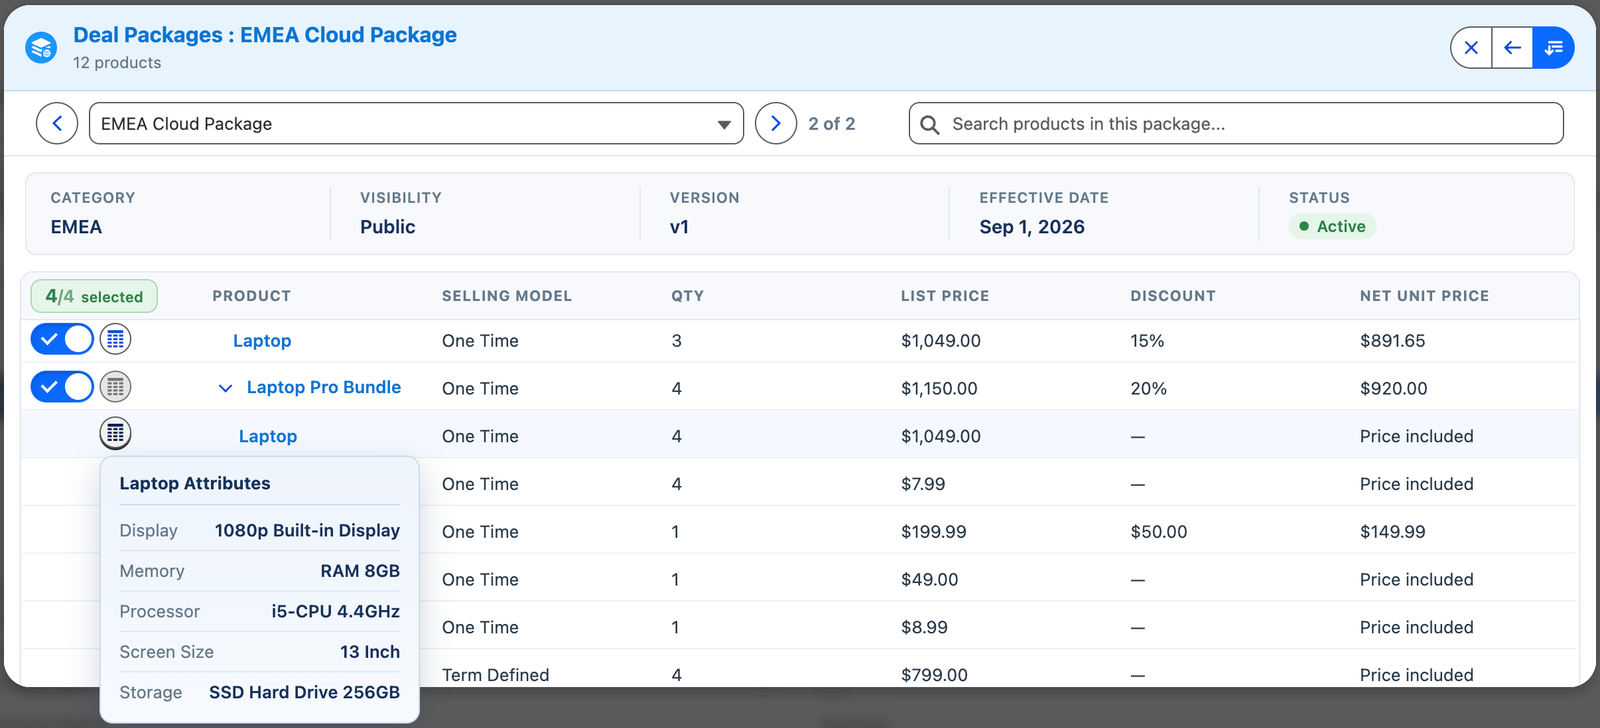
images/deal-packages/quote-review.pngReviewing a package before loading it- If you selected more than one package, use or the drop-down to switch between them.
- Use the search box to find a product inside the package.
- The header fields show the package's Category, Visibility, Version, Effective Date and Status.
- The product table shows each product's Selling Model, Qty, List Price, Discount and Net Unit Price. Bundle products have an expand arrow so you can see their child products, which show Price included when their price is part of the bundle.
- Hover the icon on a product to see its attribute values.
- Use each product's toggle to include it or leave it out. The header shows how many products are selected.
- In a Private package, the product toggles are locked for regular users, who load the package as it is. A Deal Package admin can still use them to choose which products to include.
Step 5: Load the package
| Icon | Action | What it does |
|---|---|---|
| Back | Returns to the package list. | |
| Cancel | Closes the selector without changing the quote. | |
| Load Package | Adds the selected products to the quote. |
Click Load Package. A progress message shows the package being added (Adding … to the quote), then a Package Configuration Loaded message confirms it, for example "Starter Package" has been added to the quote. The products appear on the quote's line items with the quantities, selling models and discounts defined in the package.
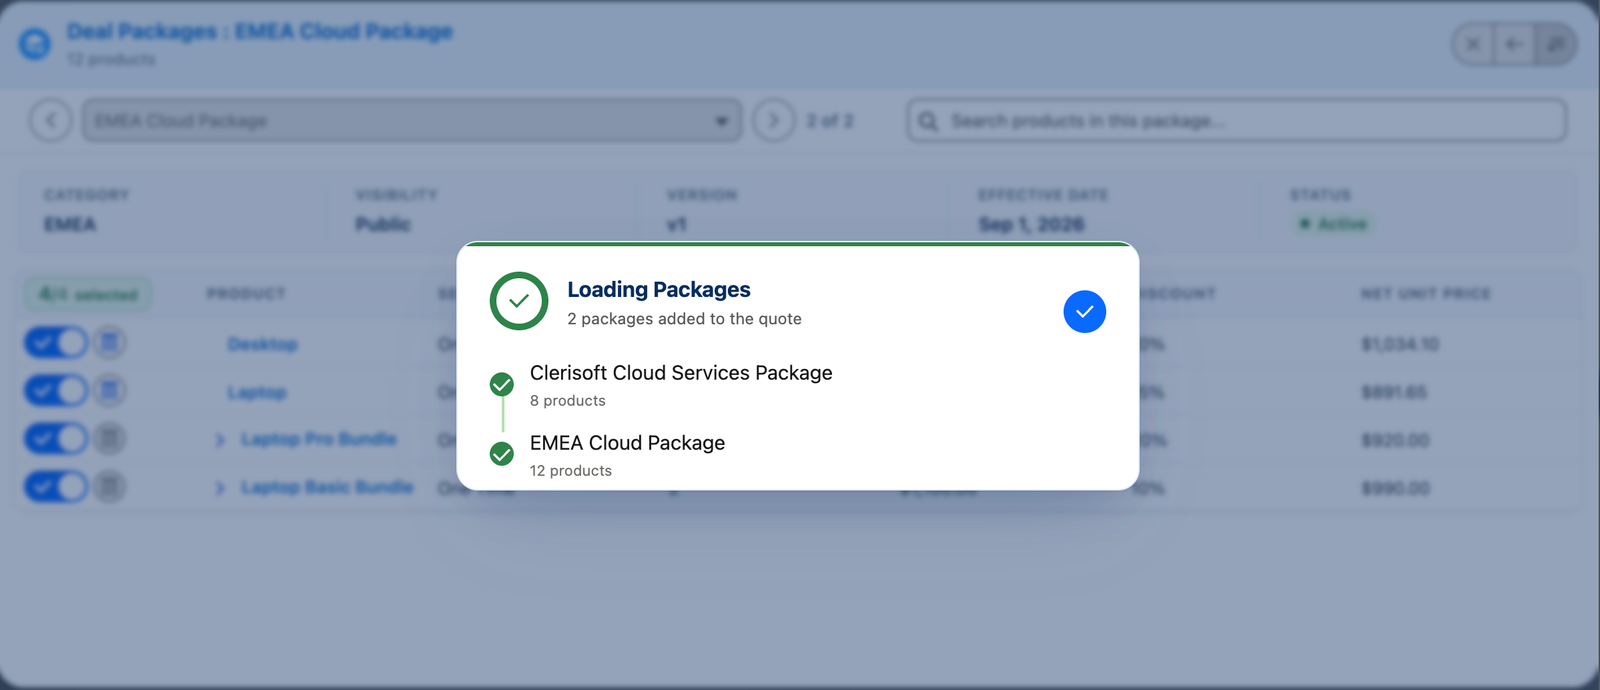
images/deal-packages/quote-loaded.pngThe quote after loading a packageLine limit: a Salesforce quote can hold up to 1,000 lines. If the selected packages plus the lines already on the quote go over that, the selector warns you and the Next step is blocked. Deselect a package to continue.
Sending Feedback
Click Send Feedback in the header bar to report a bug, request a feature or share feedback with Clerisoft without leaving Deal Packages. Choose the app or apps and the kind of feedback, write your message, and send it. Your name, role, profile and org details are added for you, and you are copied on the email.
The full steps and what is sent are in the Sending Feedback guide.