
Overview
CD (Context Definitions) Hub gives you one place to browse and manage context definitions. Each definition is shown with its related data, including nodes, attributes, versions and references.
You need the proper permissions in your org to use CD Hub. Without them, parts of a definition show No access and buttons you are not allowed to use are grayed out. Standard definitions are read-only, so for those you can only browse, extend or clone them. If you do not have enough access or permissions, please reach out to your system administrator for assistance.
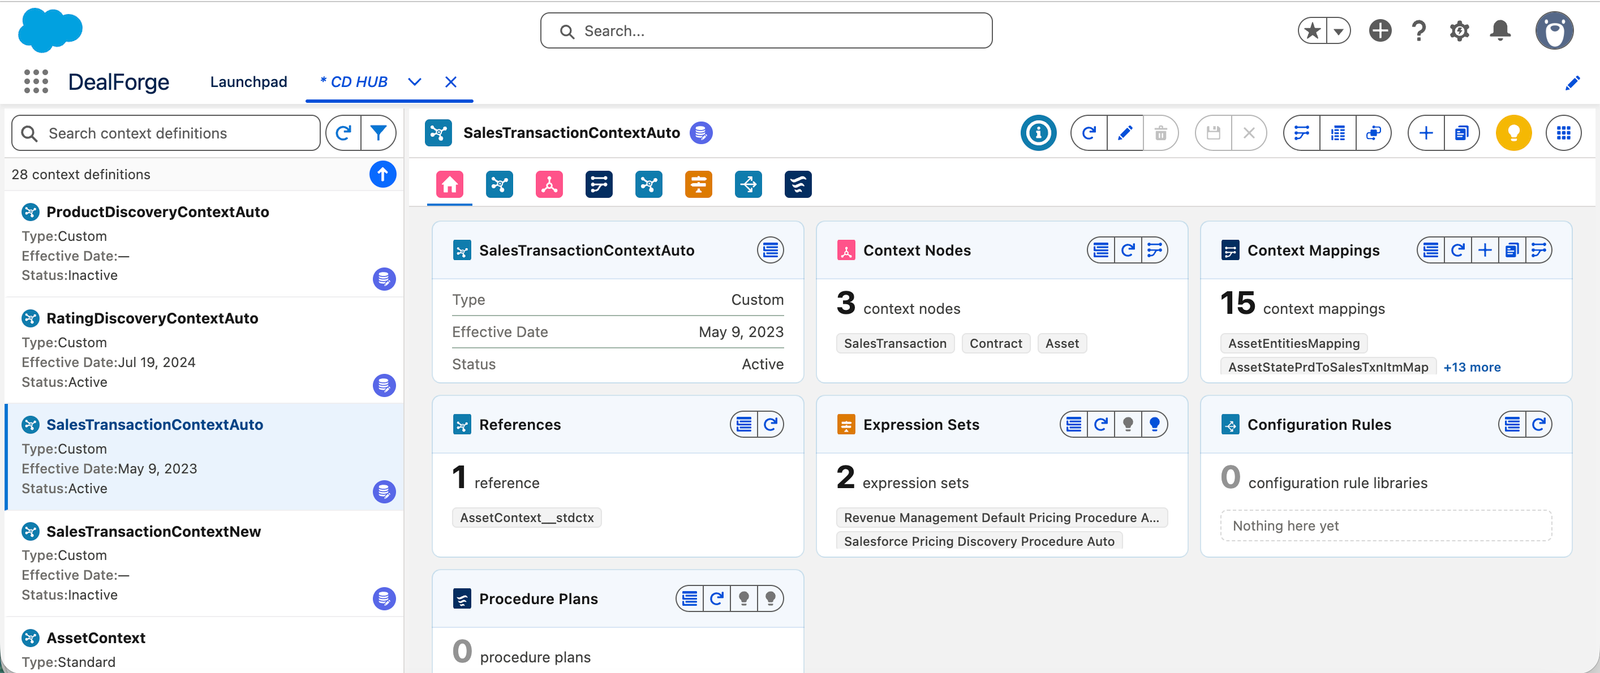
images/cd-hub/overview.pngCD Hub overviewWhy Use CD Hub
- Design structures and manage mappings. Build the structure of a definition and map it to your fields.
- Simulate transactions and visualize data. Try a definition out on real records and see the result as a tree.
- Create and map cross-object twin fields. Copy a field's value from one record to the next in a business process.
User Personas
| Persona | What they do | How they use CD Hub |
|---|---|---|
| Salesforce Administrator | Maintains the org's configuration. | Browses and checks context definitions and their attributes. |
| Revenue Cloud Consultant | Implements and tunes Revenue Cloud for customers. | Reviews how definitions, nodes and attributes are set up. |
| Solution Architect | Designs how data flows through the revenue process. | Uses versions and references to understand impact before making changes. |
App Layout
CD Hub opens as a two-pane workspace: a list of context definitions on the left and the selected definition on the right.
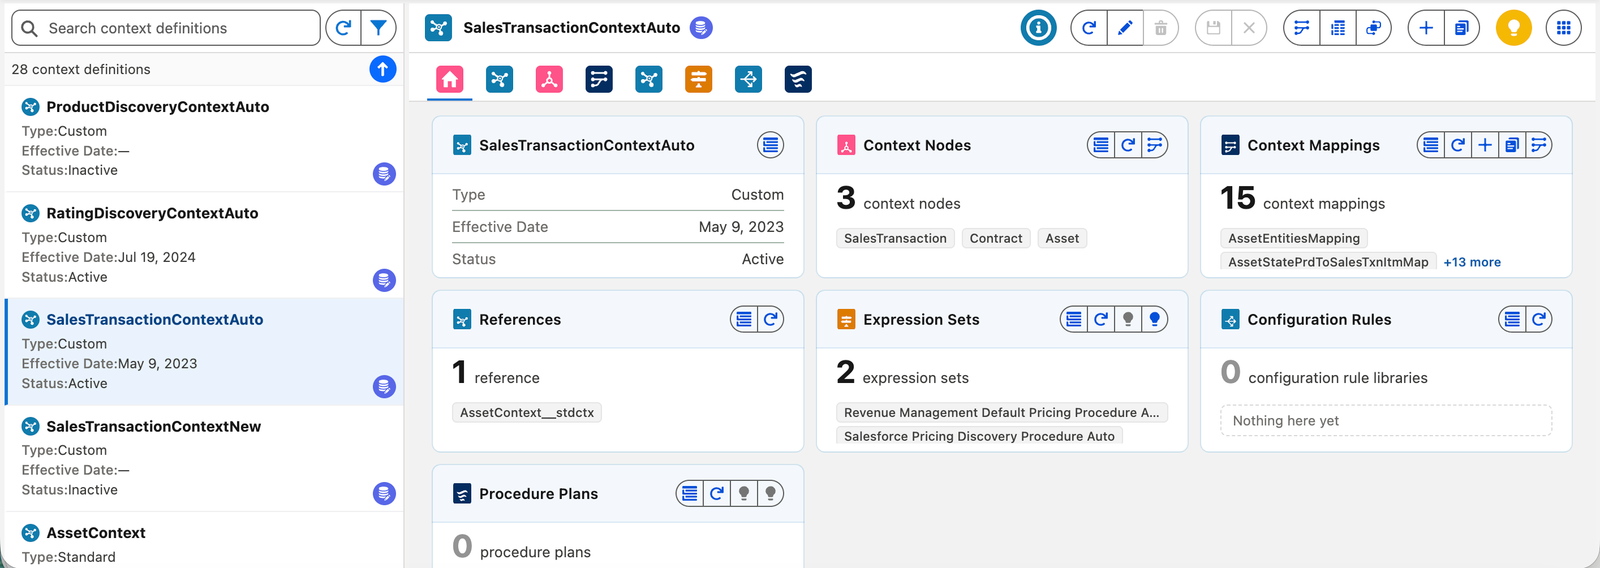
images/cd-hub/app-layout.pngThe CD Hub workspace, with each area numbered below- Header bar. Shows the app icon and the name of the selected definition. A round custom-definition icon next to the name flags definitions you created. The action buttons on the right are listed under Header bar actions.
- Search box. Type to narrow the list by name. Use the clear (x) icon inside the box to reset it.
- Refresh and filter. Next to the search box, a connected pair of buttons reloads the list and opens the filter panel. Use the filter panel to build your own criteria (a field, an operator and a value; add as many conditions as you need) or to apply, edit, save or delete a saved list view. See the List Views guide.
- Result count and sort. A line under the toolbar shows how many definitions match. The sort button beside it toggles between ascending and descending order.
- Definition list. Each definition is a tile showing its Type (Standard or Custom), Effective Date and Status (Active or Inactive). Custom definitions carry a small custom icon in the corner. Click a tile to open that definition in the right panel.
- Tabs. The right panel has an Overview tab, a Details tab and one tab per related list: Context Nodes, Context Mappings, References, Expression Sets, Configuration Rules and Procedure Plans. The tab names show how many records each list holds once it has loaded.
- Right panel. The content area under the tabs. On the Overview tab it shows a summary card for each related list, each with its own action buttons in the card header. The other tabs show the full details or the full list.
Header bar actions
The buttons in the header bar act on the selected definition. Hover over any button to see its tooltip. A button is grayed out when it does not apply, for example when you do not have permission or the license is blocked. Which buttons appear depends on the type of definition you selected.
Both types
| Icon | Action | What it does |
|---|---|---|
| Guidance | Opens app-specific guidance for using CD Hub. | |
| Refresh | Reloads the selected definition from the server. | |
| Send Feedback | Opens a form to report a bug, request a feature or share feedback with Clerisoft. See Sending Feedback. | |
| App launcher | Hover to see every DealForge app and jump to any of them. |
Standard definitions (read-only)
| Icon | Action | What it does |
|---|---|---|
| Extend | Creates a custom definition that extends this one. | |
| Clone | Creates a copy of this definition to start a new one. | |
| View Structure & Mapping | Browse this definition's nodes and attributes, and how they map to data. | |
| Simulate | Tries this definition out with sample data. | |
| Twin Fields | Maps fields through context definitions. |
Custom definitions
| Icon | Action | What it does |
|---|---|---|
| Edit | Switches to edit mode so you can change the definition's details. | |
| Delete | Permanently deletes the definition after you confirm. This cannot be undone, and an active definition must be deactivated first. | |
| Save / Cancel | Appear while editing. Save keeps your changes; Cancel discards them and leaves edit mode. | |
| Edit Structure & Mapping | Add, change or remove this definition's nodes and attributes, and map them to data. Opens the editor with its Structure and Mappings tabs. | |
| Simulate | Tries this definition out with sample data. | |
| Twin Fields | Maps fields through context definitions. | |
| New | Creates a new custom definition. | |
| Clone | Creates a copy of this definition to start a new one. | |
| Activate / Deactivate | One light bulb button that shows the definition's state. A white bulb on yellow means the definition is active; a black bulb on grey means it is inactive. Click it to switch the definition on or off. |
Definition list actions
| Icon | Action | What it does |
|---|---|---|
| Search / clear | Filters the list as you type; clear empties the box. | |
| Refresh | Reloads the context definition list from the server. | |
| Filter | Builds custom criteria to filter the list, or applies a saved list view. You can filter on name, API name, description, base definition, standard, active, reference definition, context TTL, created date and last modified date. | |
| Sort | Toggles the list between ascending and descending order. |
Related list actions
Some tabs add buttons to their title row, and the same buttons appear in the matching card header on the Overview tab, next to that card's Refresh button. In each picker, an N selected label with a small clear button sits in the first row, above the search box.
| Icon | Tab | Action | What it does |
|---|---|---|---|
| Context Nodes | Edit Structure | Add, change or remove the nodes and attributes of this definition. Opens the editor on its Structure tab. | |
| Context Mappings | New Mapping | Adds an empty context mapping to the definition (see Editing, Creating or Cloning Mappings). | |
| Context Mappings | Clone Mapping | Creates a copy of one of the definition's mappings. Each mapping tile in Quick View also has its own clone button. | |
| Context Mappings | Edit Mappings | Change how this definition's nodes and attributes map to data. Opens the editor on its Mappings tab. | |
| Context Mappings | Make default | Marks a mapping as the default. A star shows which mapping is the default. | |
| Expression Sets, Procedure Plans | Activate | Yellow bulb. Opens a picker of the inactive sets or plans so you can choose which to switch on. Grayed out when none are inactive. | |
| Expression Sets, Procedure Plans | Deactivate | Grey bulb. Opens a picker of the active sets or plans so you can choose which to switch off. Grayed out when none are active. |
The Edit and Activate buttons are disabled for standard definitions and while you are editing.
Using List Views
Click Filter beside the search box to narrow the definition list. Build conditions on fields such as name, API name, base definition, standard, active and created date, then apply them once, or save them as a list view you can bring back with one click and, if you are an administrator, share with your team as a Public view.
The full steps, the operators for each type of field and the difference between a saved view and a quick view are in the List Views guide.
Activating and Deactivating
A context definition has to be active before the platform uses it at run time, and inactive before you can change much of it. CD Hub lets you switch the definition itself, and the expression sets and procedure plans that depend on it, from the same place.
Activating or deactivating a definition
Select the definition, then click the light bulb button in the header bar.
| State | Bulb | Click it to |
|---|---|---|
| Inactive | Black bulb on grey | Activate the definition. |
| Active | White bulb on yellow | Deactivate the definition. |
While it works, a screen with a spinner covers the app. When it finishes, a message confirms the change, and the list and the selected definition refresh to show the new state.
- Only custom definitions can be activated or deactivated here. The button is disabled for standard definitions, and while you are editing.
- If the platform refuses, the message shows its reason. A definition that expression sets or other items still depend on may need those switched off first; see below.
When to deactivate
Deactivate a definition before you:
- change its existing nodes and attributes (see Editing the Structure of a Custom Definition);
- change or delete its mappings (see Editing, Creating or Cloning Mappings);
- set up Twin Fields on it, which only accepts inactive definitions.
Activate it again when you are done. A new definition made by cloning starts inactive.
Seeing the related expression sets
Expression sets are the pricing and qualification rules that run on a definition. To see the ones that belong to the selected definition, use either place:
- the Expression Sets tile on the Overview tab, which shows a quick view; or
- the Expression Sets tab, which lists every set with its name, API name, usage type and whether it is active. The tab name shows the count.
Procedure Plans work the same way, on their own tile and tab, with the plan's rank and effective dates in place of a usage type.
Activating or deactivating several at once
Expression sets and procedure plans each have two light bulb buttons, on their Overview tile and in the tab's title row:
| Icon | Action | What it does |
|---|---|---|
| Activate | Opens a picker of the sets or plans that are inactive. Grayed out when everything is already active. | |
| Deactivate | Opens a picker of the sets or plans that are active. Grayed out when nothing is active. |
In the picker:
- Tick the sets or plans you want. Use the search box to narrow a long list, and Select all to tick everything shown.
- The row above the list shows how many you have selected; clears the selection.
- Select the Activate or Deactivate button in the title bar.
A message reports how many were changed. If some could not be changed, it still reports the ones that were, and names each that failed with the platform's reason. A set that was already in the state you asked for is left alone. The tab refreshes afterwards so the Active column is up to date.
The platform can refuse to deactivate a definition while an active expression set still uses it. If that happens, deactivate the definition's expression sets first (select all in the Deactivate picker), then deactivate the definition. To bring everything back, activate the definition first, then its expression sets.
Activating an expression set turns on its latest version. Deactivating one turns off every version that is active.
Cloning or Extending a Standard Definition
Standard definitions are read-only, so to change one you start from a custom definition built on it. There are two ways to do that. Both open the same popup and both create a new custom definition.
| Extend | Clone | |
|---|---|---|
| What you get | A custom definition that inherits everything from the standard one and stays linked to it. | An independent copy of the definition, including all its nodes, attributes, tags and mappings. |
| Link to the original | Kept. The new definition is built on the standard one. | None. The copy stands on its own. |
| Available on | Standard definitions only. | Standard and custom definitions. |
| Starts | As a custom definition. | Inactive. |
| Popup banner | Purple. | Teal. |
Which one should I use? Extend when you want to add your own nodes and attributes on top of the standard definition and keep what it provides. Clone when you want a copy you can reshape freely.
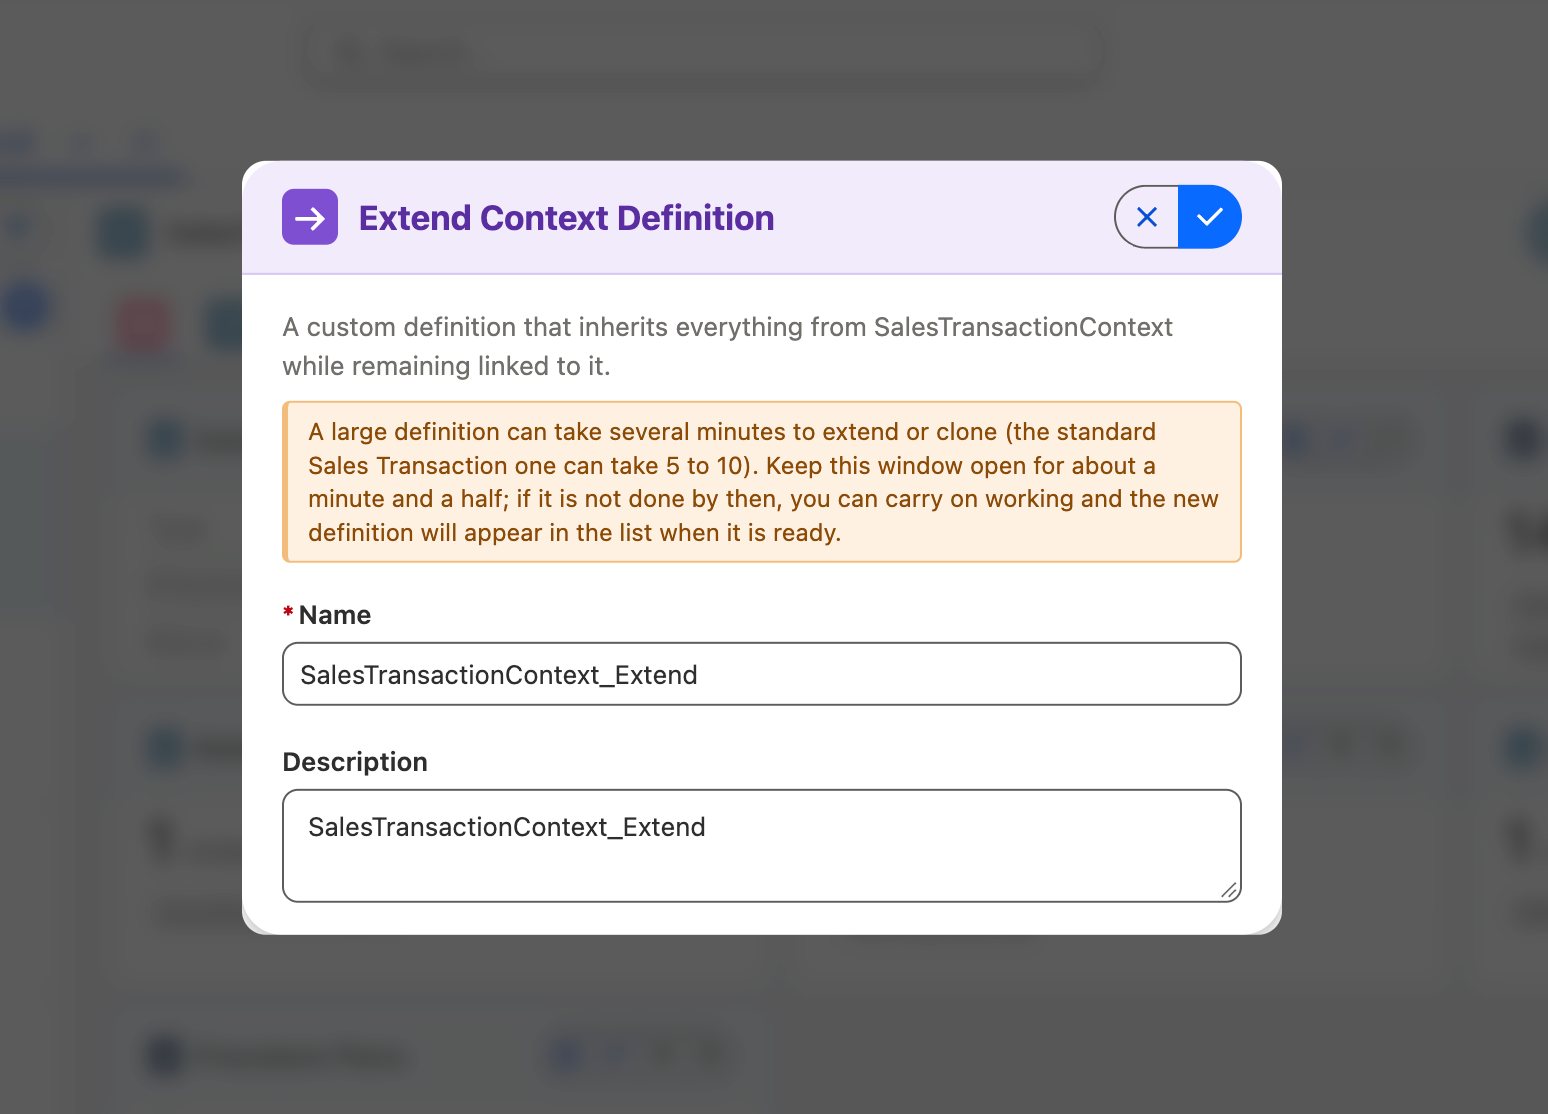
images/cd-hub/extend-clone.pngThe Extend popup. Clone looks the same, with a teal bannerStep 1: Select the standard definition
Pick the definition in the list on the left. For a standard one, the header bar shows Extend and Clone as the first two action buttons (see Header bar actions).
Step 2: Open the popup
Click Extend or Clone. The popup is titled Extend Context Definition or Clone Context Definition. A line under the title describes what you are about to create from the definition you selected.
| Icon | Action | What it does |
|---|---|---|
| Cancel | Closes the popup without creating anything. | |
| or | Extend / Clone | Creates the new definition. Available once the name is valid. |
Step 3: Name the new definition
| Field | Notes |
|---|---|
| Name | Required, up to 30 characters. Use letters, numbers and underscores only; start with a letter and do not end with an underscore. The name must not match an existing definition. The popup tells you if it is taken. |
| Description | Optional. For a clone, whatever you enter replaces the description copied from the original, and leaving it blank clears it. |
Extending or cloning is done by the platform, and a large definition can take several minutes. The standard Sales Transaction definition, for example, can take 5 to 10 minutes. Smaller ones finish in under a minute.
The popup waits about a minute and a half. If the definition is not ready by then, you are told it is still being built and can carry on working. It keeps building in the background and appears in the list when it is ready, so give it a few minutes and then use Refresh above the list. You do not need to start it again, and doing so will not speed it up.
Step 4: Start working on it
When it finishes within the wait, a confirmation message appears, the list refreshes, and the new definition is selected. The structure editor opens straight away so you can start adding your own nodes and attributes. If it takes longer, you are told it is still being built: find it in the list with Refresh once it is ready, and select it yourself. After that, the new definition is a custom definition like any other: you can edit it, map it, simulate it and activate it from the header bar.
On an extension, the names of the nodes and attributes you add yourself end in __c, which the platform requires. The app adds the ending for you when you leave it off, which also makes your own additions easy to tell apart from the ones inherited from the standard definition.
Things to know
- Standard definitions never change. Extending or cloning leaves the original exactly as it was.
- Extend is only for standard definitions. To make a copy of a custom definition, use Clone.
- Do not start the same one twice. If a large definition seems slow, wait and refresh the list. A second attempt with the same name will fail, because the name is already in use.
- A new definition starts inactive when cloned. Activate it with the light bulb button in the header bar when it is ready.
Creating or Cloning a Custom Definition
Custom definitions are the ones you own. You can start a brand-new one from scratch, or copy an existing custom definition to use as a starting point. Both open a popup like the one used to extend a standard definition.
| New | Clone | |
|---|---|---|
| What you get | An empty custom definition with only the details you enter. | An independent copy of the custom definition you selected, including all its nodes, attributes, tags and mappings. |
| Popup title | New Context Definition | Clone Context Definition |
| Banner | Blue. | Teal. |
| Time it takes | Usually about 10 to 20 seconds. | Seconds for a small definition, several minutes for a large one (see Large definitions take time). |
Both buttons are in the header bar when a custom definition is selected, next to each other (see Header bar actions). They are grayed out if you do not have permission to create context definitions. To clone a standard definition, see Cloning or Extending a Standard Definition.
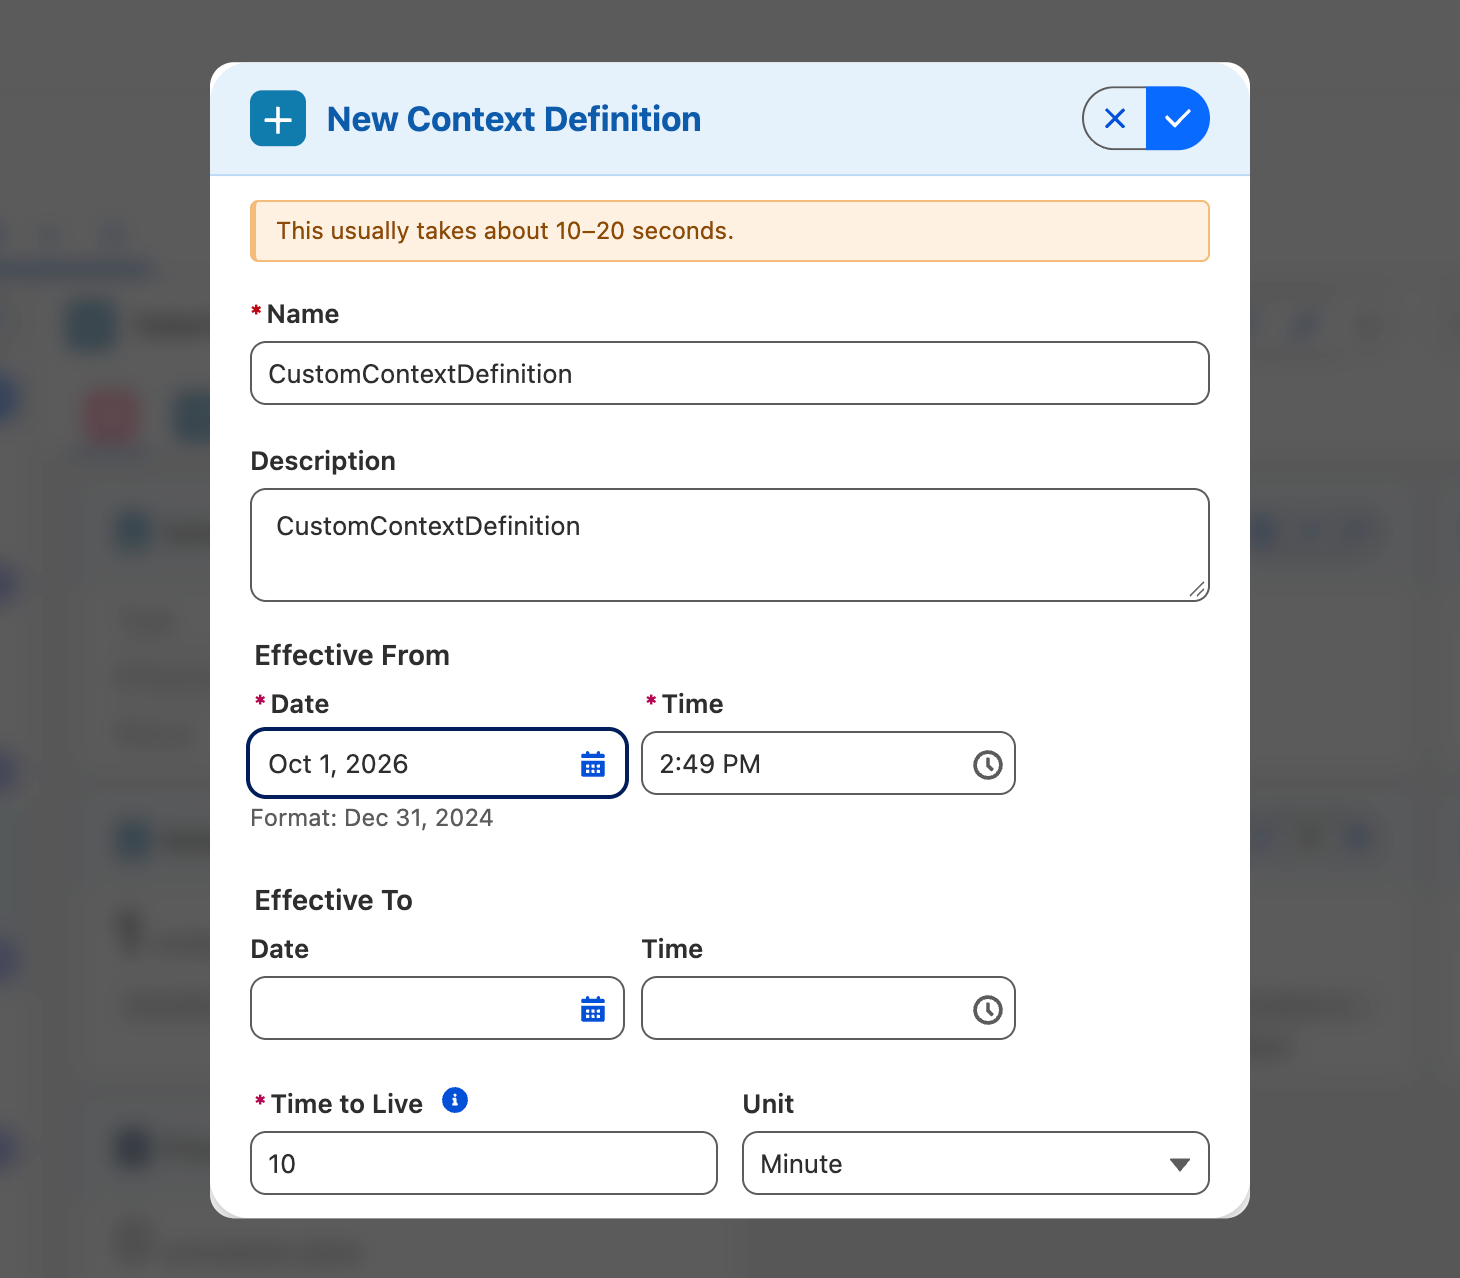
images/cd-hub/create-definition.pngThe New Context Definition popupCreating a new definition
- Select any custom definition in the list, then click New in the header bar.
- Fill in the details in the popup (below).
- Click Create. Click Cancel to leave without creating anything.
| Field | Notes |
|---|---|
| Name | Required, up to 30 characters. It becomes both the definition's label and its API name. Use letters, numbers and underscores only; start with a letter and do not end with an underscore. The name must not match an existing definition. The popup tells you if it is taken. |
| Description | Optional. It starts out as a copy of the name, and you can change it. |
| Effective From | Required. The date and time the definition takes effect. It starts as the current date and time. |
| Effective To | Optional. When the definition stops being effective. If you set it, it must be later than Effective From. |
| Time to Live | Required. How long a context stays alive after its last use. Enter a whole number and choose a unit of minutes, hours or days. It is saved in minutes. It starts at 10 minutes. |
| Reference Definition | A checkbox that lets other definitions use this one as a reference. |
| Reference Definition(s) | Optional. Click Add Reference Definition to pick another definition this one should reference, and add as many as you need. Each definition can be picked once, and only definitions that allow being referenced are offered. Use to remove a row. |
Cloning a custom definition
- Select the custom definition you want to copy, then click Clone in the header bar.
- Enter a Name (same rules as above) and, if you like, a Description. Whatever you enter replaces the description copied from the original, and leaving it blank clears it.
- Click Clone.
A clone only asks for a name and a description. Check the new definition's details afterwards, and change anything that should differ from the original.
What happens next
When it finishes, a confirmation message appears, the list refreshes, and the new definition is selected. The structure editor opens straight away so you can start adding nodes and attributes. A clone starts inactive. Activate it with the light bulb button in the header bar when it is ready.
Cloning a large definition can take several minutes. If the popup stops waiting before it is done, you are told it is still being built. It appears in the list when it is ready, so give it a few minutes and use Refresh.
Editing the Structure of a Custom Definition
The structure of a definition is its tree of context nodes and the attributes each node holds. You can build and change it on any custom definition in the structure editor. Standard definitions can only be browsed (see Cloning or Extending a Standard Definition if you need to change one).
Nothing you do in the editor is saved straight away. Every change is staged, counted in the popup's title bar, and sent to the org only when you review and click Save.
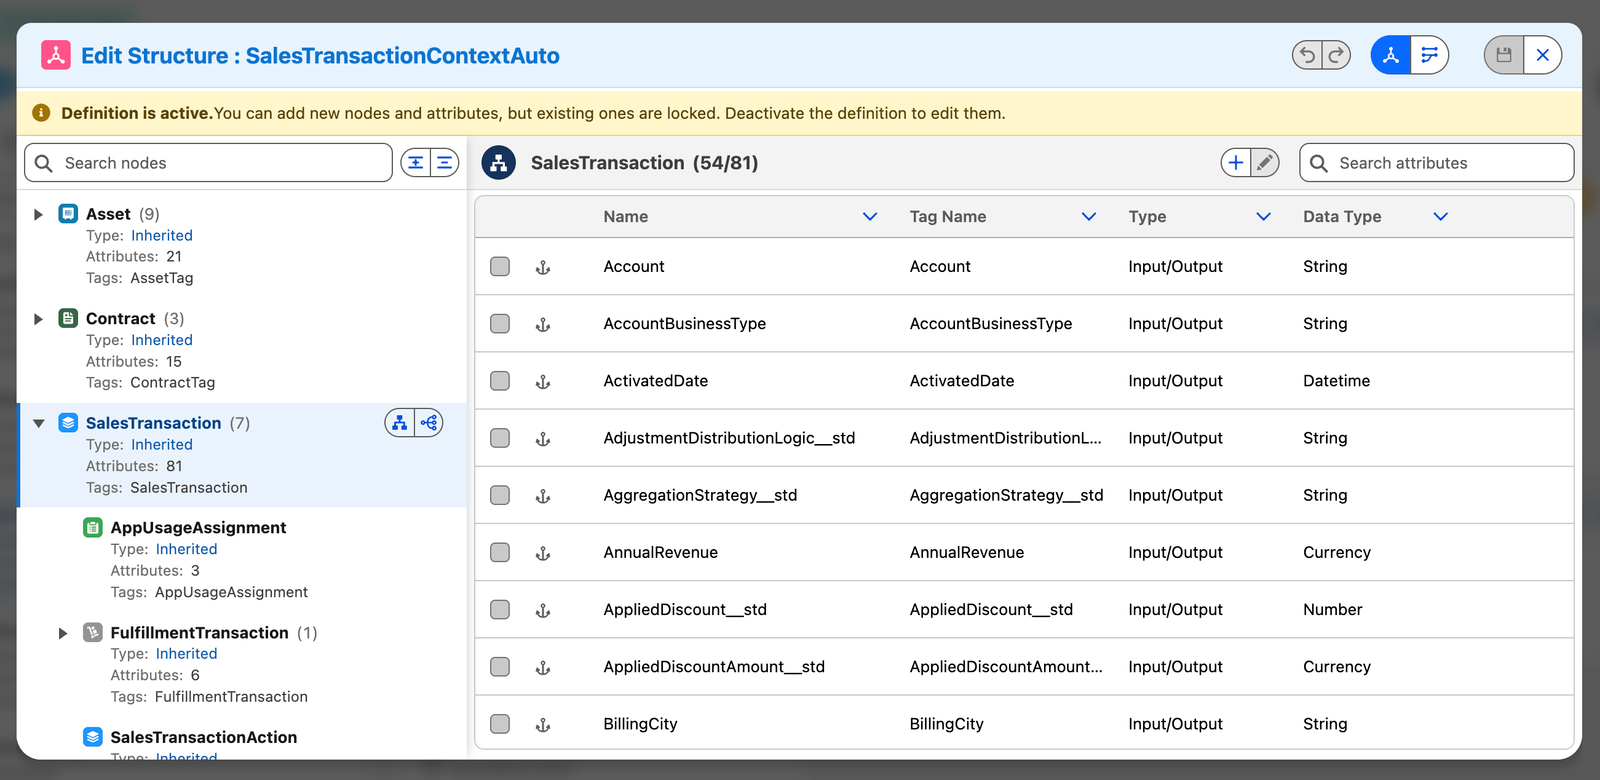
images/cd-hub/structure-editor.pngThe structure editor, with a node selectedOpening the structure editor
Select a custom definition, then use either of these:
| From | How |
|---|---|
| Header bar | Click Edit Structure & Mapping. The editor opens on its Structure tab. |
| Context Nodes tab | Click Edit Structure in the tab's title row, or in the Context Nodes card on the Overview tab. It opens straight on the Structure tab. |
The popup is titled Edit Structure : definition name. A new definition opens it for you automatically. If the definition is active, a notice at the top says so: you can still add new nodes and attributes, but the existing ones are locked. Deactivate the definition (the light bulb in the header bar) to edit them.
Popup title bar
| Icon | Action | What it does |
|---|---|---|
| Structure / Mappings | Switches between the two editors. If you have unsaved changes you are asked to save or discard them first. | |
| Undo / Redo | Steps back through your staged changes, or brings back a change you undid. | |
| N changes | A count of changes not yet saved. | |
| Save | Opens the review step (below). Grayed out until there is something to save. | |
| Close | Closes the editor. With unsaved changes you are asked whether to keep editing or discard them. |
The node tree
The left side is the tree of nodes. Each row shows the node's name, its Type (where it comes from: Standard, Inherited or Custom), how many Attributes it has and its Tags. Click a node to see its attributes on the right.
| Icon | Action | What it does |
|---|---|---|
| Search nodes | Narrows the tree by name, display name, type or tag. | |
| Expand all / Collapse all | Opens or closes every branch. |
A definition with no nodes yet shows a message and an Add Root Node button.
Adding and changing nodes
Select a node and its action buttons appear on the row.
| Icon | Action | What it does |
|---|---|---|
| Add Child Node | Adds a node under the selected one. | |
| Add Sibling Node | Adds a node alongside the selected one. | |
| Edit Node | Changes the node's display name, description or tags. Not available on a node inherited from a standard definition. | |
| Delete Node | Marks the node, and everything under it, for deletion. Not available on a node that is inherited, or that has an inherited node beneath it. On an active definition, only nodes you added and have not saved yet can be deleted. |
The node popup asks for:
| Field | Notes |
|---|---|
| Name | Required. Must be unique within the definition. It cannot be changed once other nodes refer to it (it has child nodes or is the target of a reference). |
| Display Name | Optional. The friendly name, up to 255 characters. |
| Description | Optional, up to 1,000 characters. |
| Tags | Optional. Type a tag and click to add it. Tags that already exist are shown with a lock and cannot be removed. |
On an extension of a standard definition, a node's name must end in __c. The app adds it for you if you leave it off.
Adding and changing attributes
The right side lists the attributes of the selected node, with their name, tag name, type and data type. Small icons mark an attribute that is inherited or transient.
| Icon | Action | What it does |
|---|---|---|
| Add Attributes | Opens a grid where you can enter one or more new attributes at once. Use Add row for more. | |
| Edit Selected | Tick the rows you want to change, then edit them together in the same grid. Grayed out until a row is ticked. | |
| Row buttons | Edit or delete a single attribute. Inherited attributes, ones already marked for deletion and saved ones of an active definition have no buttons; hover the row to see why. |
The attribute fields are:
| Field | Notes |
|---|---|
| Name | Required. |
| Tags | Optional. Separate several with commas. |
| Display Name and Description | Optional. |
| Field Type | Input or Input / Output. Reference attributes are always input only. |
| Data Type | String, Number, Boolean, Date, Date Time, Currency, Percent, Picklist, Reference, Self Reference or Lookup. |
| Referenced Object | The node the attribute points to. Appears, and is required, when the Data Type is Reference. |
| Transient | Keeps the value for the current context only. |
| Keep Localization | Keeps the attribute's translations. |
How staged changes look
Until you save, your changes are highlighted so they are easy to spot. Changed and added rows get an amber bar. A row marked for deletion is struck through and tagged Marked for deletion; use Undo to bring it back.
Saving
- Click Save. A Review Your Changes popup lists every staged change, such as an added node or a deleted attribute.
- Check the list, then click Save to send the changes to the org, or Cancel to go back to editing.
- A spinner shows while the changes are saved. When it finishes, the editor shows the saved structure.
There is a limit to how many changes one save can carry. If you reach it, the editor tells you (Change limit reached) and offers to save what you have so far, which resets the allowance. Then keep going.
Unsaved changes are lost when you close the editor. The popup asks you to confirm first, and it also asks you to save or discard when you switch between the Structure and Mappings tabs, because each tab saves from its own staged changes.
Editing, Creating or Cloning Mappings
A context mapping says where each node and attribute of a definition gets its data. A definition can hold several mappings, and one of them is the default. On a custom definition you can edit the mappings it has, add a new one, or copy one as a starting point. Everything is done in the same place, the Mappings tab of the structure editor.
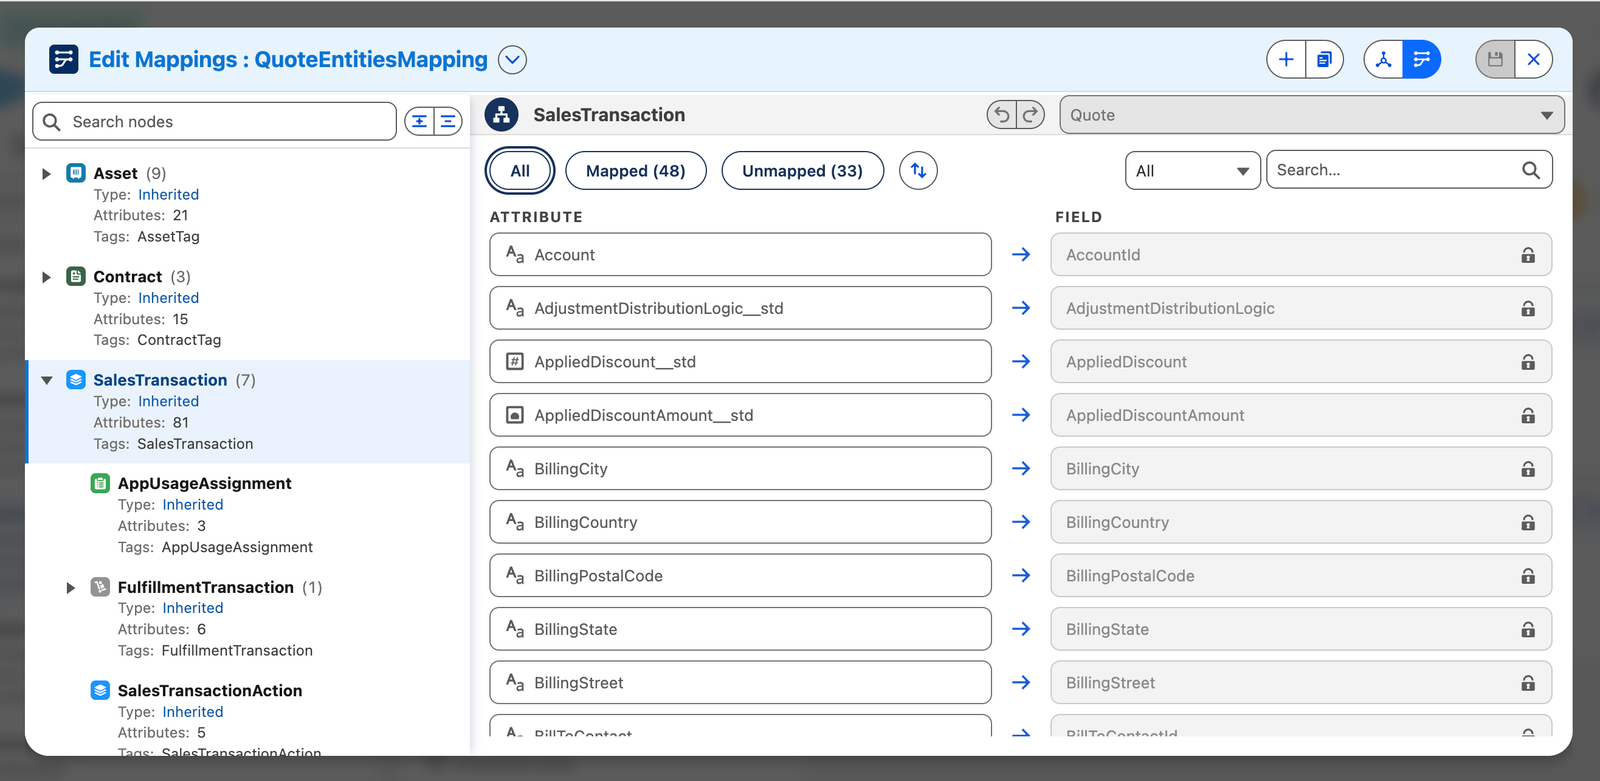
images/cd-hub/mapping-editor.pngThe Edit Mappings popup, with a node selectedOpening the mapping editor
| From | How |
|---|---|
| Header bar | Click Edit Structure & Mapping, then choose the Mappings tab in the popup. |
| Context Mappings tab | Click Edit Mappings in the tab's title row, or in the Context Mappings card on the Overview tab. It opens straight on the Mappings tab. |
The popup is titled Edit Mappings : mapping name. Next to the title, the button lists every mapping in the definition; the one you are on has a check mark. Hover over it to open the list and click a mapping to switch to it. If you have unsaved changes you are asked before they are dropped.
Mappings that come from a standard definition (inherited mappings) can be viewed but not changed. They show a lock in the editor.
Editing a mapping
The left side is the tree of nodes. Pick a node to see its attributes on the right.
| Part | What it does |
|---|---|
| Data source box (top right) | The object or node the selected node reads its data from. A node with no source yet in this mapping shows a Select Object box; click it to choose a Salesforce object, or a node of another context definition. Once a node has a source it cannot be changed. |
| Undo / Redo the changes you have made in this mapping. | |
| All, Mapped, Unmapped | Filters the attributes, with a count on each. |
| Sort | Toggles A to Z and Z to A within the mapped and unmapped groups. |
| Search | Searches the attributes. The box beside it chooses where to look: All, Attribute names or Field names. Use to reset it. |
Each row pairs an attribute with the field it is mapped to, or Not mapped. To map or change one:
- Click the field box on the row. The field picker opens.
- Search for a field, or open a relationship with the arrow beside it to look inside the related object. The path across the top shows where you are, and you can click it to go back.
- Pick the field. Only fields whose type suits the attribute are offered, and a field already used by another attribute of the mapping is not available.
- To remove a mapping, clear the selection in the picker.
Changed rows are highlighted until you save. Use the Unmapped filter to see what is still left to map.
Saving mapping changes
Nothing is saved straight away. Click Save in the popup's title bar to review every staged change, then confirm. The review lists the data sources and field choices you added, changed or removed, for the mapping you are on. Switching to the Structure tab, or to another mapping, first asks you to save or discard what you have staged.
Creating or cloning a mapping
| New Mapping | Clone Mapping | |
|---|---|---|
| What you get | An empty mapping with only a name and description. Map its nodes and attributes afterwards, as above. | A copy of an existing mapping, with all its node mappings and attribute mappings, including fields reached through relationships. |
| Popup title | New Context Mapping | Clone Context Mapping |
| Banner | Blue. | Teal. |
| Default mapping | Never. Use the star on the Context Mappings tab to change the default. | Never. The copy is not the default. |
Both buttons are available only on a custom definition that you can edit, and are grayed out otherwise. Clone is also grayed out when the definition has no mappings yet.
Where to find the buttons
| Place | How |
|---|---|
| Context Mappings tab | New Mapping and Clone Mapping in the tab's title row. |
| Overview tab | The same two buttons in the Context Mappings card header. |
| Quick View | Hover the Context Mappings card's Quick View button; each mapping tile has a Clone mapping button, which opens the popup with that mapping already chosen. |
| Edit Structure & Mapping popup | On the Mappings tab, the same two buttons sit in the title bar. They are grayed out while you have unsaved mapping changes; save or undo them first. |
To add a mapping
- Click New Mapping.
- Enter a Name, and a Description if you like.
- Click Create. Click Cancel to leave without creating anything.
To clone a mapping
- Click Clone Mapping (or the clone button on a mapping tile).
- Choose the Mapping to clone. It starts on the default mapping, or the one whose tile you used.
- Enter a Name, and a Description if you like.
- Click Clone.
| Field | Notes |
|---|---|
| Name | Required, up to 30 characters. Use letters, numbers and underscores only; start with a letter and do not end with an underscore. The name must not match another mapping in the definition. The popup tells you if it is taken. |
| Description | Optional. |
Adding a mapping usually takes a few seconds. Cloning a large mapping, such as the main Sales Transaction one, takes longer because every row is copied. When it finishes, a confirmation message appears and the new mapping shows up on the Context Mappings tab and in the mapping picker of the popup. If the popup is open, it switches to the new mapping straight away, so you can start mapping.
You can add a mapping to an active definition, but the platform does not let you change or delete mappings on it until the definition is deactivated. If a clone fails part-way on an active definition, the partly copied mapping cannot be removed automatically. The message names it so you can deactivate the definition and delete it. For a smooth start, deactivate the definition first, add and fill in your mapping, then activate it again.
Simulating a Definition
Simulate lets you try a mapping out on real records, before anything depends on it. You pick a record for each object the mapping reads, press Simulate, and CD Hub builds the context from those records and shows you the result as a tree of nodes, attributes and values. Use it to check that the right fields land in the right attributes. Simulating does not change the definition.
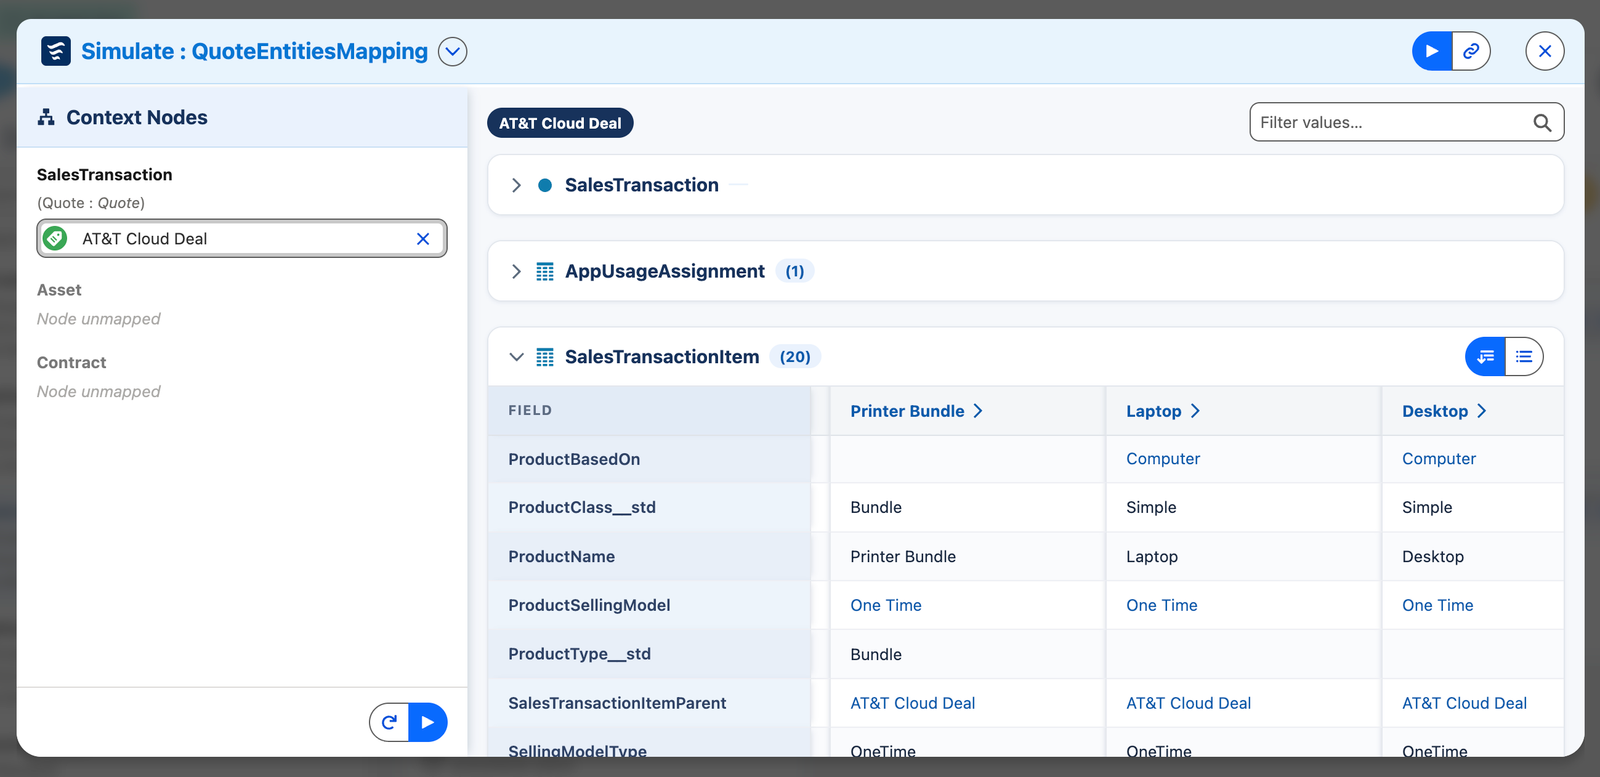
images/cd-hub/simulate.pngThe Simulate popup, with a result openOpening Simulate
Select a definition and click Simulate in the header bar. It is available on standard and custom definitions, with one rule: a custom definition must be active to be simulated, because a context can only be built from an active version. If the button is grayed out, hover over it to see why. Standard definitions can be simulated at any time.
The popup is titled Simulate : mapping name. Next to the title, the button lists the definition's mappings; hover over it and click one to simulate that mapping instead. The mapping you are on has a check mark.
Popup title bar
| Icon | Action | What it does |
|---|---|---|
| Simulate | The simulation view, described below. | |
| Mappings | A read-only look at the mapping you are simulating, so you can check what it reads without leaving the popup. Switch back with the Simulate button. | |
| Close | Closes the popup. |
Picking the records
The left side lists the Context Nodes of the mapping. For each node the mapping reads from an object, there is a record box showing the object's name, such as Quote. Click it to search for a record and pick one. You do not need to fill every box, but you need at least one.
A node the mapping does not map shows Node unmapped and cannot be picked.
| Icon | Action | What it does |
|---|---|---|
| Reset | Clears the records you picked, the result, the filter and any error. Grayed out when there is nothing to clear. | |
| Simulate | Builds the context from the records you picked. Grayed out until you pick at least one. |
Reading the result
The right side shows the context that was built. If the mapping produces a single top record, it opens straight away; otherwise select a row to open it.
| Part | What it does |
|---|---|
| Path across the top | Shows the records you have opened, from the top one down, each named by its Name or Id. Click any step to go back up to it. |
| Filter | Narrows the values on screen. Use to reset it. |
| Sections | One per node. Each has a title with a count, and can be collapsed or expanded by clicking its title. |
| Grid | Fields run down the side, with one column per record. Scroll sideways when there are many records. Values are shown the way they are in Salesforce: dates, currency, numbers and percentages are formatted, and an Id of a record that could be read is shown as its name, with a link that opens it in a new tab. |
| Opening a record | A section that lists child records shows one column per record, and each record's column heading has an arrow. Click it to open that record and see its own attributes and its children. |
| With values / All fields |
When a simulation fails
A message in place of the result explains why. Two are worth knowing:
- This mapping can't be simulated. A node in the mapping is mapped, but its parent node is not. A mapped node needs its parent mapped too. Map the parent in this mapping (see Editing, Creating or Cloning Mappings), or choose another mapping from the title bar.
- The simulation failed. The platform could not build the context from the records you picked. The message includes the platform's own reason. Check that you picked sensible records for the mapped objects and try again, using Reset to start clean.
Twin Fields
A Twin Field is a field that exists on two records in a business process, such as a custom field on a quote and the same field on the order made from it. Twin Fields sets up the context definition mappings that copy the value across, so you don't have to build each mapping by hand in the editor. You pick the two fields, and CD Hub creates the attribute, the tag and the mappings on both sides.
Opening Twin Fields
Select Twin Fields in the header bar. It is available for standard and custom definitions, and it does not depend on the definition you have selected: you choose the context definitions to change inside the popup.
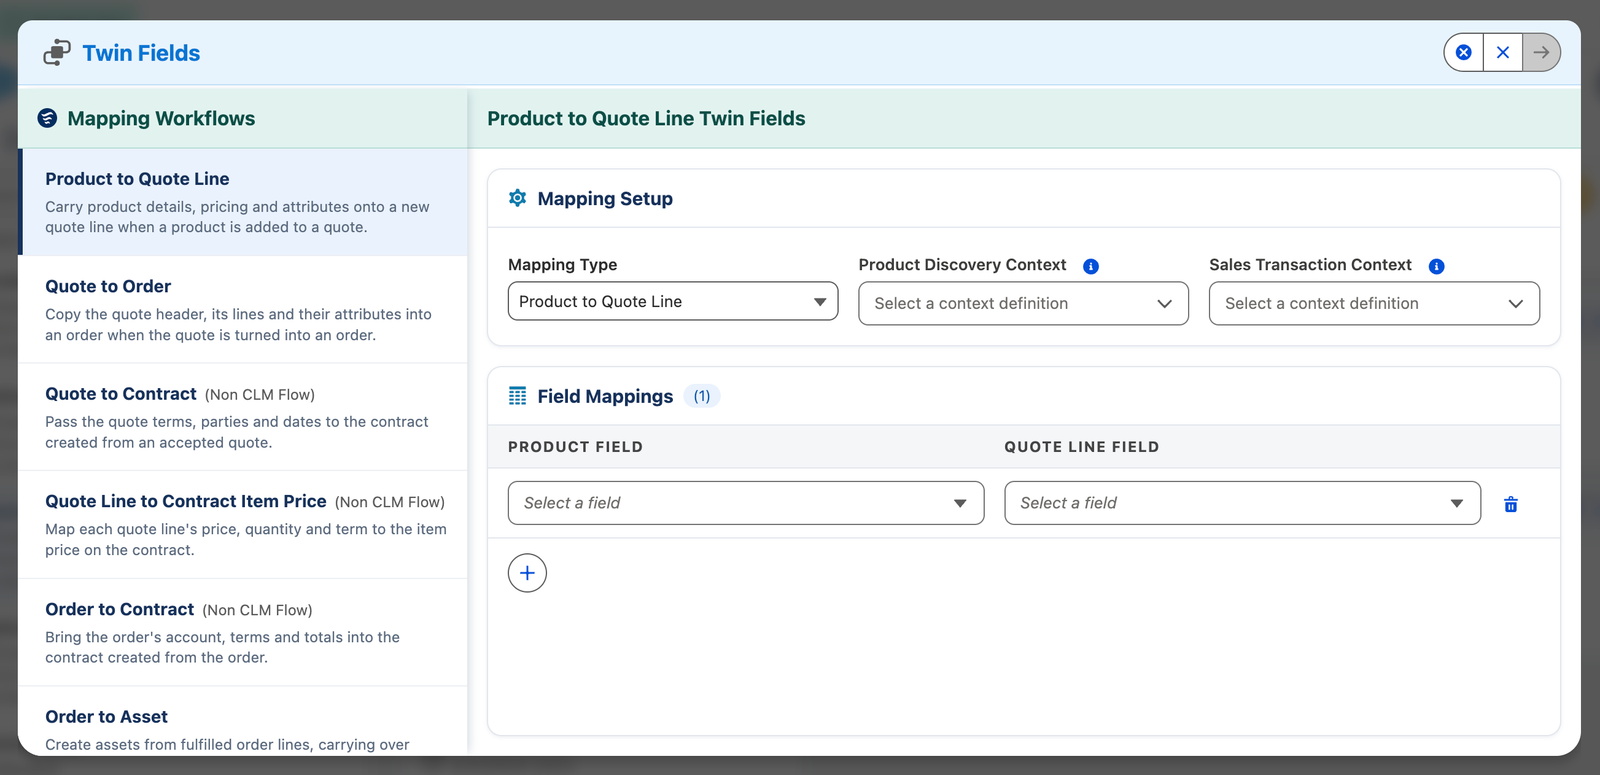
images/cd-hub/twin-fields.pngTwin Fields: workflows on the left, the chosen workflow on the rightThe popup has two sides. The left lists the workflows. The right shows the chosen workflow's setup. The footer has Clear all, Close and Proceed.
Choosing a workflow
| Workflow | What it copies |
|---|---|
| Product to Quote Line | Product fields onto the quote line when a product is added to a quote. |
| Quote to Order | Quote fields, or quote line fields, onto the order or order item. |
| Quote to Contract | Quote fields onto the contract created from the quote. |
| Quote Line to Contract Item Price | Quote line fields onto the item price on the contract. |
| Order to Contract | Order fields onto the contract created from the order. |
| Order to Asset | Order item fields onto the asset. |
| Amend, Renew, Cancel | Quote line or order item fields onto the asset state period. |
The workflows marked Non CLM Flow apply to contracts created with the standard New Contract action. Contracts created by the Contract Lifecycle Management (CLM) action use a different context definition, so these mappings are not read for them.
Setting up a workflow
- Select the workflow on the left.
- In Mapping Setup, choose the Mapping Type if the workflow offers more than one, for example Quote to Order or Quote Line Item to Order Item.
- Choose the context definition (or definitions) to change. The list shows each definition's nodes, attributes and status.
- In Field Mappings, choose a field on each side of a row. The pickers list only fields that can be mapped, and a field already used in another row is not offered again.
- Use to add a row, and to remove one.
- Select Proceed.
Active definitions can't be chosen, and a message says "Definition must be inactive for this operation." Deactivate the definition first (see App Layout), then choose it.
Proceed stays grayed out until a context definition is chosen and at least one row has both fields. Also:
- Clear all empties the workflow's rows and context choices so you can start over.
- If you switch to another workflow with unsaved rows, you are asked whether to keep editing or discard your changes.
What happens when you proceed
A progress popup shows each step as it runs, for example Processing Quote Mappings, Processing Order Mappings and Setting Default Mapping. When all steps finish, close it to return. Closing it also clears the workflow's rows, ready for the next one.
- The steps create or reuse an attribute and a tag for each field, and add the mappings that read the value from one side and write it to the other. Running a workflow again with the same fields is safe: it reuses what already exists.
- The mapping the workflow changed is set as the definition's default mapping.
- Twin Fields does not activate the definition. Review the result in the editor, then activate it yourself.
- If a step fails, the popup shows the platform's message and which step it stopped at. Fix the cause, for example by choosing an inactive definition, and proceed again.
Twin Fields maps fields; it doesn't create them. Create the field on each object first, with a data type that is compatible on both sides.
Sending Feedback
Click Send Feedback in the header bar to report a bug, request a feature or share feedback with Clerisoft without leaving CD Hub. Choose the app or apps and the kind of feedback, write your message, and send it. Your name, role, profile and org details are added for you, and you are copied on the email.
The full steps and what is sent are in the Sending Feedback guide.